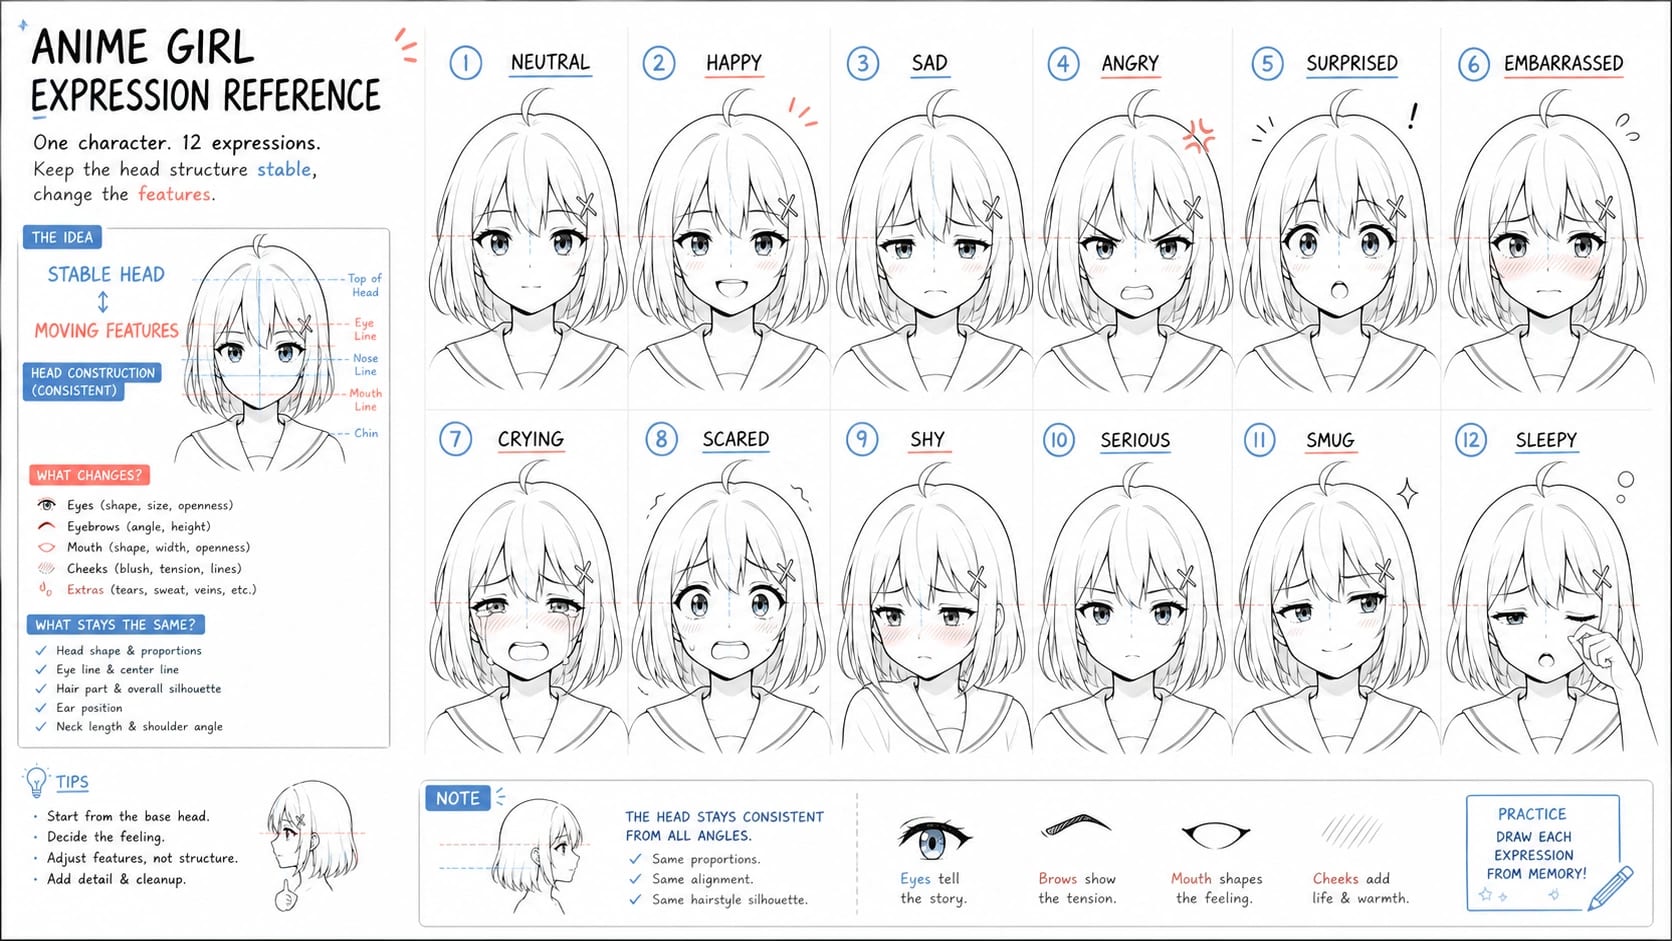
Anime girl expression references work best when you study the parts that move, not just the finished face. Start with a stable head shape, eye line, and centerline, then change the brows, eyelids, pupils, mouth, cheeks, jaw, and head angle to push the emotion. The original sheets below give you a starter set of expressions to copy once, redraw from memory, vary, and turn into your own character reference sheet.
Start With the Reference Sheet, Not a Random Gallery
A good anime girl expression reference should let you answer two questions quickly: what emotion am I drawing, and which features must change to make that emotion read? The finished face is useful, but the construction underneath matters more. If the head shape, eye line, and spacing drift every time the emotion changes, the drawing starts to look like a different character instead of the same character reacting.
Use the sheet as a starter vocabulary rather than a final library. Pick one expression, redraw it slowly, then label the moving parts: brow angle, eyelid opening, pupil position, mouth shape, cheek tension, jaw drop, and head tilt. After that, close the sheet and redraw the same emotion from memory. The memory pass is where the reference starts becoming drawing knowledge instead of a shape you can only copy.
| Expression | What usually changes first | Drawing note |
|---|---|---|
| Neutral | Balanced brows, relaxed mouth | Keep this as the identity anchor |
| Happy | Raised cheeks, curved eyes, open smile | Let the cheeks lift the lower eyelids |
| Sad | Inner brows up, mouth corners down | Avoid making only the mouth sad |
| Angry | Brows down and inward, tighter mouth | Compress the eye shape before exaggerating the teeth |
| Surprised | Wide eyes, lifted brows, open mouth | Increase vertical space without changing the face width |
| Shy | Averted eyes, small mouth, blush | Tilt the head or gaze instead of adding only marks |
| Crying | Pinched brows, wet eyes, uneven mouth | Keep the emotion asymmetrical enough to feel alive |
| Scared | High brows, small pupils, tense mouth | Show tension in both eyes and jaw |
| Serious | Lower lids, firm mouth, still head | Restraint reads stronger than overacting |
| Smug | One brow, side smile, narrowed eyes | Use asymmetry as the main signal |
| Sleepy | Heavy lids, loose mouth, low energy | Drop the rhythm of the whole face |
| Embarrassed | Blush, small mouth, broken eye contact | Pair the mark with posture or gaze |
Keep the Head Stable Before You Push Emotion
The fastest way to lose character consistency is to redraw the skull for every feeling. Before changing the expression, place a simple head structure: face outline, centerline, eye line, nose position, mouth zone, ear height, and jaw corner. These marks do not need to be heavy. They only need to keep the character's proportions stable while the emotional features move.
Think of the face as two layers. The stable layer is identity: head width, chin shape, eye spacing, nose length, mouth placement, and hairstyle framing. The movable layer is acting: brows, lids, pupils, cheeks, mouth corners, jaw opening, and tilt. Anime style often simplifies noses and cheek planes, so the movable layer has to carry more of the emotional load than it would in a more realistic portrait.
When practicing, draw three neutral heads first and then convert them into three emotions. This stops the common beginner habit of drawing a happy head, an angry head, and a sad head with different proportions. The viewer should feel that one person is making different faces, not that three separate characters were placed on a sheet.
Use Facial Controls Instead of Guessing
Most anime expressions can be built from a small set of controls. Brows show pressure and direction. Upper eyelids show alertness. Lower lids and cheeks show softness, strain, or laughter. Pupils guide attention and fear. The mouth shape gives the clearest emotional category, but it works best when the eyes already support it.
Brows and Eyelids
Brows are the quickest emotion switch. Down and inward creates anger, suspicion, or focus. Up and inward creates sadness, worry, or pleading. One raised brow creates doubt, teasing, or smugness. Eyelids decide intensity: wide lids make surprise or fear; lowered lids make boredom, seriousness, or confidence; curved closed eyes can make joy feel warm instead of loud.
Do not move the brows independently from the eyelids. An angry face with soft, open eyes often reads confused. A sad mouth with flat brows often reads tired rather than hurt. Pair each brow shape with an eye shape that supports the same emotional direction.
Mouth, Cheeks, and Jaw
The mouth names the expression, but cheeks and jaw give it weight. A smile without raised cheeks can look polite or empty. A crying mouth without jaw tension can look like mild discomfort. A surprised mouth with no change in the eyes can look like a simple vowel shape.
For a cleaner study pass, draw the same head with five mouth shapes: closed line, small open oval, wide smile, downturned curve, and uneven trembling shape. Then adjust only the brows and lids. You will see how much the meaning changes before adding blush, tears, sweat, or stylized impact lines.
Stylized Marks
Anime and manga marks are useful, but they should support the facial controls. Blush can help shy, embarrassed, feverish, or romantic expressions, but the gaze and mouth must still say which one it is. Sweat drops can support panic or awkwardness, but the brow and jaw should already show stress. Tears can support crying, but the eyes, cheeks, and mouth should carry the emotion even if the tear lines are removed.
Draw the Same Emotion Across Angles
An expression that works in front view can collapse when you rotate the head. The solution is not to memorize a separate reference for every angle. Keep the same control logic and wrap it around the head. In a three-quarter view, the far eye becomes narrower, the mouth corner on the far side travels around the form, and the centerline tells you where the nose and lips sit. In a side view, the brow ridge, upper lip, lower lip, and chin profile carry more information because the second eye is hidden or reduced.
Try this transfer exercise:
| Step | Front view | Three-quarter view | Side view |
|---|---|---|---|
| 1 | Mark the centerline and eye line | Turn the centerline around the face | Use the profile line as the center guide |
| 2 | Place both brows clearly | Compress the far brow and eye | Show brow tilt through the silhouette |
| 3 | Set the mouth shape | Wrap the mouth around the muzzle area | Use lip angle and jaw opening |
| 4 | Add cheeks, blush, tears, or marks | Reduce far-side marks | Keep only marks that read in profile |
| 5 | Check the emotion without labels | Compare with the front view | Compare with the front view |
For happy expressions, watch the cheek lift. For angry expressions, watch the inward compression of the brows. For crying expressions, watch the uneven mouth and pinched brow. If those core controls survive the rotation, the expression usually reads even with fewer details.
Practice Expressions as a Workflow
Reference practice is strongest when it has a repeatable order. Browsing boards can help you discover poses and emotional categories, but drawing improves when every reference becomes a small study. Use this loop:
- Observe the finished face for ten seconds.
- Annotate the moving controls: brows, lids, pupils, mouth, cheeks, jaw, and head tilt.
- Copy the expression once for private practice.
- Hide the reference and redraw from memory.
- Change one control while keeping the rest stable.
- Invent a new version for your own character.
- Save the best version into a personal expression sheet.
The one-control variation is the most important part. Change only the brows and ask what emotion remains. Change only the mouth and compare the result. Change only the head tilt or gaze direction. This teaches you which features define the expression and which features only decorate it.
Build a Character Expression Sheet
A character sheet should not be a collection of unrelated attractive faces. It should show the same character under different emotional loads. Start with a neutral model head and write down the identity anchors: eye size, eye spacing, face shape, nose simplification, mouth placement, hair mass, and any marks or accessories. Then make each expression answer one acting question.
For example, "happy" is too broad. Draw a soft happy face, a loud happy face, and a relieved happy face. "Angry" can be cold anger, embarrassed anger, or explosive anger. "Serious" can be calm focus, distrust, or disappointment. This matters because anime characters often repeat the same base face; the expression sheet is where personality enters.
Keep the first sheet small. Twelve expressions are enough for a useful starter set: neutral, happy, sad, angry, surprised, embarrassed, crying, scared, shy, serious, smug, and sleepy. After that, build combinations. A shy smile, angry crying face, sleepy embarrassment, or smug surprise often teaches more than another perfectly separate category.
Use Online References Without Copying Blindly
Online references are useful for private study, gesture ideas, and expression vocabulary, but they are not automatically safe to republish as traced drawings or copied character faces. Treat outside images as learning material. Study the control pattern, then redraw it on your own head construction, your own character proportions, and your own acting choice.
A simple rule helps: if your drawing still needs the source image beside it to feel complete, it is probably a copy. If you can explain the feature changes and redraw the expression from memory on a different character, you have learned from the reference. Save your original sheet, not the copied study, as the piece you share.
Quick Drawing Checklist
Before finishing an anime girl expression drawing, check the face in this order:
- Does the head still look like the same character?
- Are the brow angle and eyelid shape pushing the same emotion?
- Does the mouth match the eyes, or is it doing all the work alone?
- Did the cheeks, jaw, and head tilt add believable force?
- Can the expression still read if blush, tears, sweat, or marks are removed?
- Does the expression work from the angle you chose?
- Did you create an original version rather than only copying the reference?
If one expression feels weak, do not immediately search for another image. First compare it with the neutral face. Then adjust one control at a time. Most expression problems are not caused by missing references; they are caused by too many features moving without a clear job.
FAQ
What are the main anime expression names to practice?
Start with neutral, happy, sad, angry, surprised, embarrassed, crying, scared, shy, serious, smug, and sleepy. These are not the only possible anime expressions, but they give you a compact range of positive, negative, quiet, loud, open, and closed emotions.
How do I use an anime girl expression reference without copying it?
Label the feature changes first, copy once only for private study, hide the reference, redraw from memory, and then apply the same controls to your own character. The goal is to learn the brow, eye, mouth, cheek, jaw, and head-angle pattern behind the expression.
What makes a female anime face reference useful for drawing?
Useful female anime face references preserve the same character proportions across expressions. The head shape, eye spacing, chin, and feature placement stay recognizable while the brows, eyelids, mouth, cheeks, and jaw change to show emotion.
How do I draw a serious anime girl face?
Use lowered or steadier eyelids, a controlled mouth, minimal cheek movement, and a still head angle. Serious faces often fail when they are overdrawn. Let restraint, symmetry, and a firm gaze do most of the work.
What is the easiest anime face expression for beginners?
A soft happy face is usually the easiest starting point because the controls are clear: slight brow lift, curved eyes or relaxed lids, raised cheeks, and an upward mouth. After that, practice sad and angry faces because they force you to control brow direction more carefully.
Should I draw expressions from front view first?
Yes. Front view makes it easier to compare the left and right side of the face and understand which controls are moving. Once the expression reads clearly in front view, transfer it to three-quarter and side views using the same brow, eye, mouth, cheek, jaw, and head-angle logic.