Clawdbot Installation Guide 2026: Complete OpenClaw Setup for WhatsApp, Telegram & Discord
Step-by-step guide to install Clawdbot (now OpenClaw) on macOS, Linux, Windows WSL2, and Docker. Covers system requirements, security configuration, messaging channel setup for WhatsApp, Telegram, and Discord, plus API cost optimization strategies.
Nano Banana Pro
4K-80%Google Gemini 3 Pro · AI Inpainting
谷歌原生模型 · AI智能修图

OpenClaw has rapidly become one of the most talked-about open-source projects in early 2026, amassing over 100,000 GitHub stars within days of its viral adoption. If you've been searching for a clawdbot installation guide, you've likely noticed the naming confusion surrounding this project. Originally released as Clawdbot, then briefly renamed to Moltbot following an Anthropic trademark request, the project now officially goes by OpenClaw. This guide covers all three names because search results and community discussions still reference them interchangeably.
What makes OpenClaw worth the installation effort? Unlike cloud-based AI assistants that forget your conversations after each session, OpenClaw runs on your own hardware, maintains persistent memory across interactions, and connects directly to messaging platforms you already use daily. You can message your AI assistant through WhatsApp, Telegram, Discord, or Slack, and it responds with full context of your previous conversations. The assistant can also take proactive actions like sending morning briefings, executing terminal commands, and managing your calendar with your explicit approval.
This comprehensive clawdbot installation guide walks you through every step from system requirements to production-ready deployment. Whether you're setting up on a Mac Mini for always-on home use, configuring a VPS for remote access, or running in Docker for isolation, you'll find detailed instructions tailored to your platform. We'll also cover the security configurations that many guides overlook, real API cost data based on actual user reports, and optimization strategies to keep your monthly bills manageable.
What is OpenClaw (Clawdbot)?
OpenClaw is a self-hosted, open-source personal AI assistant that bridges large language models like Claude with your everyday messaging applications. Created by Peter Steinberger, founder of PSPDFKit (now Nutrient), the project emerged from the vision of having a truly personal AI companion that lives on your own infrastructure rather than in someone else's cloud.
The architecture centers around a component called the Gateway, which acts as the central hub connecting multiple messaging channels to AI model backends. When you send a message through WhatsApp, the Gateway receives it, routes it to your configured AI model (typically Claude), processes the response, and sends it back through the same channel. This design means your conversations, preferences, and data never leave your control unless you explicitly configure external integrations.
What distinguishes OpenClaw from alternatives like Auto-GPT or simple chatbot wrappers is its focus on practical, everyday usefulness combined with robust security defaults. The project implements a pairing system similar to Bluetooth device pairing, meaning unknown contacts cannot simply message your bot and start consuming your API credits or accessing your system. Every new contact must be explicitly approved before the assistant processes their messages.
The persistent memory feature deserves special attention because it fundamentally changes how AI assistants work. When you tell OpenClaw about an important meeting next week, it remembers. When you share your preferences for how you like code formatted, it remembers. This context persists across sessions, devices, and even restarts, creating an assistant that genuinely learns your patterns rather than starting fresh every conversation.
OpenClaw supports multiple AI model backends including Anthropic Claude (recommended), OpenAI GPT models, and local models through Ollama. While optimized for Claude, you can switch between models based on task complexity or cost considerations. If you're new to Claude's capabilities, our Claude AI complete guide provides essential background. The project has attracted over 50 contributors and maintains an active community with thousands of members in their Discord server.
System Requirements
Before diving into installation, verify your system meets the minimum requirements. OpenClaw has been designed to run efficiently, but certain baselines must be met for stable operation.
| Requirement | Minimum | Recommended | Notes |
|---|---|---|---|
| Node.js | 22.0+ | Latest LTS | Required runtime |
| Operating System | macOS, Linux, Windows (WSL2) | macOS 14+, Ubuntu 22.04+ | Native Windows not supported |
| RAM | 1GB | 2GB+ | 2GB essential for npm install |
| Storage | 500MB | 2GB+ | Logs and workspace grow over time |
| Network | Outbound HTTPS | Low latency connection | For API and messaging services |
The Node.js 22+ requirement is strict because OpenClaw uses modern JavaScript features unavailable in earlier versions. Check your Node version with node --version before proceeding. If you need to install or upgrade Node.js, the official Node.js website provides installers for all platforms, or you can use version managers like nvm or fnm for more flexibility.
Windows users must understand that native Windows is officially unsupported and known to have compatibility issues. The Windows Subsystem for Linux 2 (WSL2) with Ubuntu is strongly recommended and provides a near-native Linux experience. If you're on Windows and haven't set up WSL2, this becomes your first prerequisite. Microsoft's documentation covers WSL2 installation, and the process takes approximately 15 minutes.
For VPS deployments, a 1GB RAM droplet can technically work for simple tasks after installation, but the npm install phase often throws out-of-memory errors on 1GB instances. Either temporarily upgrade to 2GB during setup or configure swap space as a workaround. The Digital Ocean community guide specifically recommends 2GB as the safe minimum for hassle-free installation.
macOS users running Apple Silicon (M1/M2/M3) enjoy fully native support with excellent performance. Intel Macs from 2018 onward also work well. For dedicated home server use, many community members report running OpenClaw on Mac Mini devices, which provide a good balance of performance, low power consumption, and macOS stability.
Choosing Your Installation Method
OpenClaw offers four installation paths, each suited to different use cases and technical comfort levels. Your choice affects not just the initial setup but ongoing maintenance and update procedures.
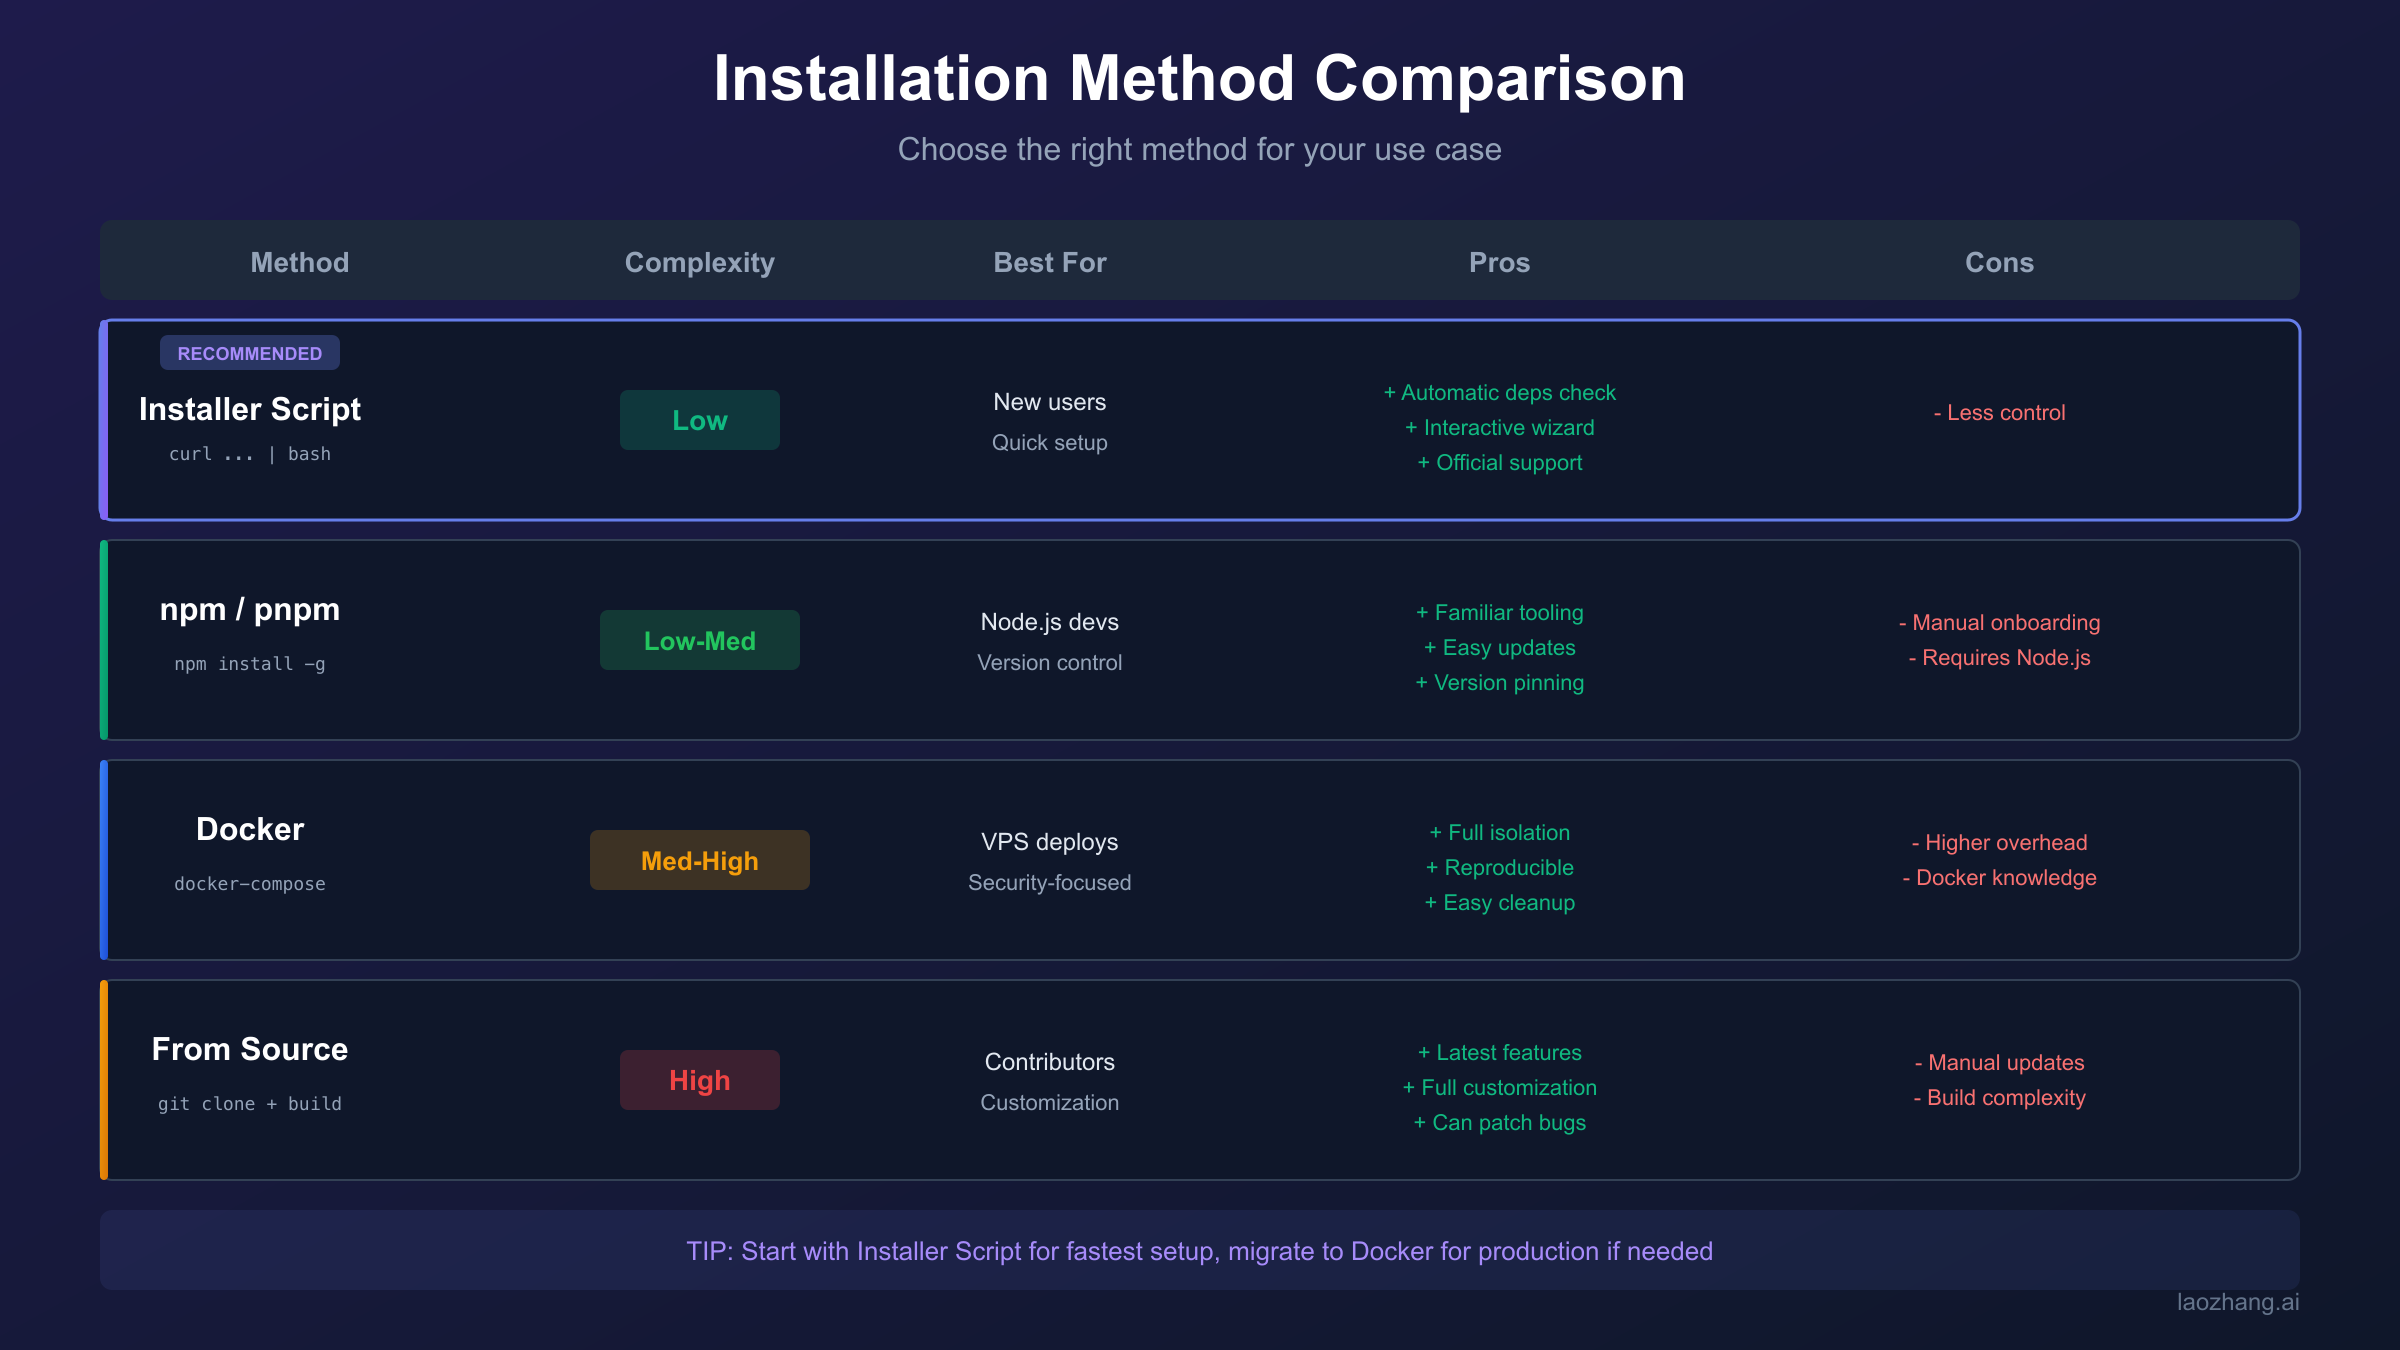
Quick Installer Script (Recommended for most users): The curl-based installer handles dependency checks, installation, and initial configuration through an interactive wizard. This method works on macOS and Linux, requires the fewest manual steps, and follows Anthropic's recommended approach for new users.
npm/pnpm Global Install: Direct package manager installation gives you more control over where files go and how updates are handled. This method suits developers already comfortable with Node.js tooling and those who prefer explicit version management. You'll run the onboarding wizard separately after installation.
Docker: Containerized deployment provides maximum isolation from your host system. Docker is ideal for VPS deployments, teams requiring reproducible environments, or security-conscious users who want strict boundaries around what OpenClaw can access. The tradeoff is added complexity in configuration and slightly higher resource overhead.
From Source: Building from the GitHub repository gives you access to the latest unreleased features and the ability to modify the code. This path suits contributors, developers building integrations, or anyone who needs to patch behavior not yet in released versions.
| Method | Best For | Complexity | Update Process |
|---|---|---|---|
| Installer Script | New users, quick setup | Low | Re-run installer |
| npm/pnpm | Node.js developers | Low-Medium | npm update -g |
| Docker | VPS, security-focused | Medium-High | docker pull |
| From Source | Contributors, customization | High | git pull + rebuild |
The decision often comes down to your primary deployment target. Local development on your personal machine typically favors the installer script or npm method. Production deployments on VPS servers lean toward Docker for its isolation and reproducibility. If you're evaluating whether OpenClaw fits your needs, start with the installer script for the fastest path to a working system, then migrate to Docker later if production requirements demand it.
Quick Start: Install in 3 Commands
For those who want OpenClaw running as quickly as possible, here's the fastest path to a working installation. These commands work on macOS and Linux (including WSL2 on Windows).
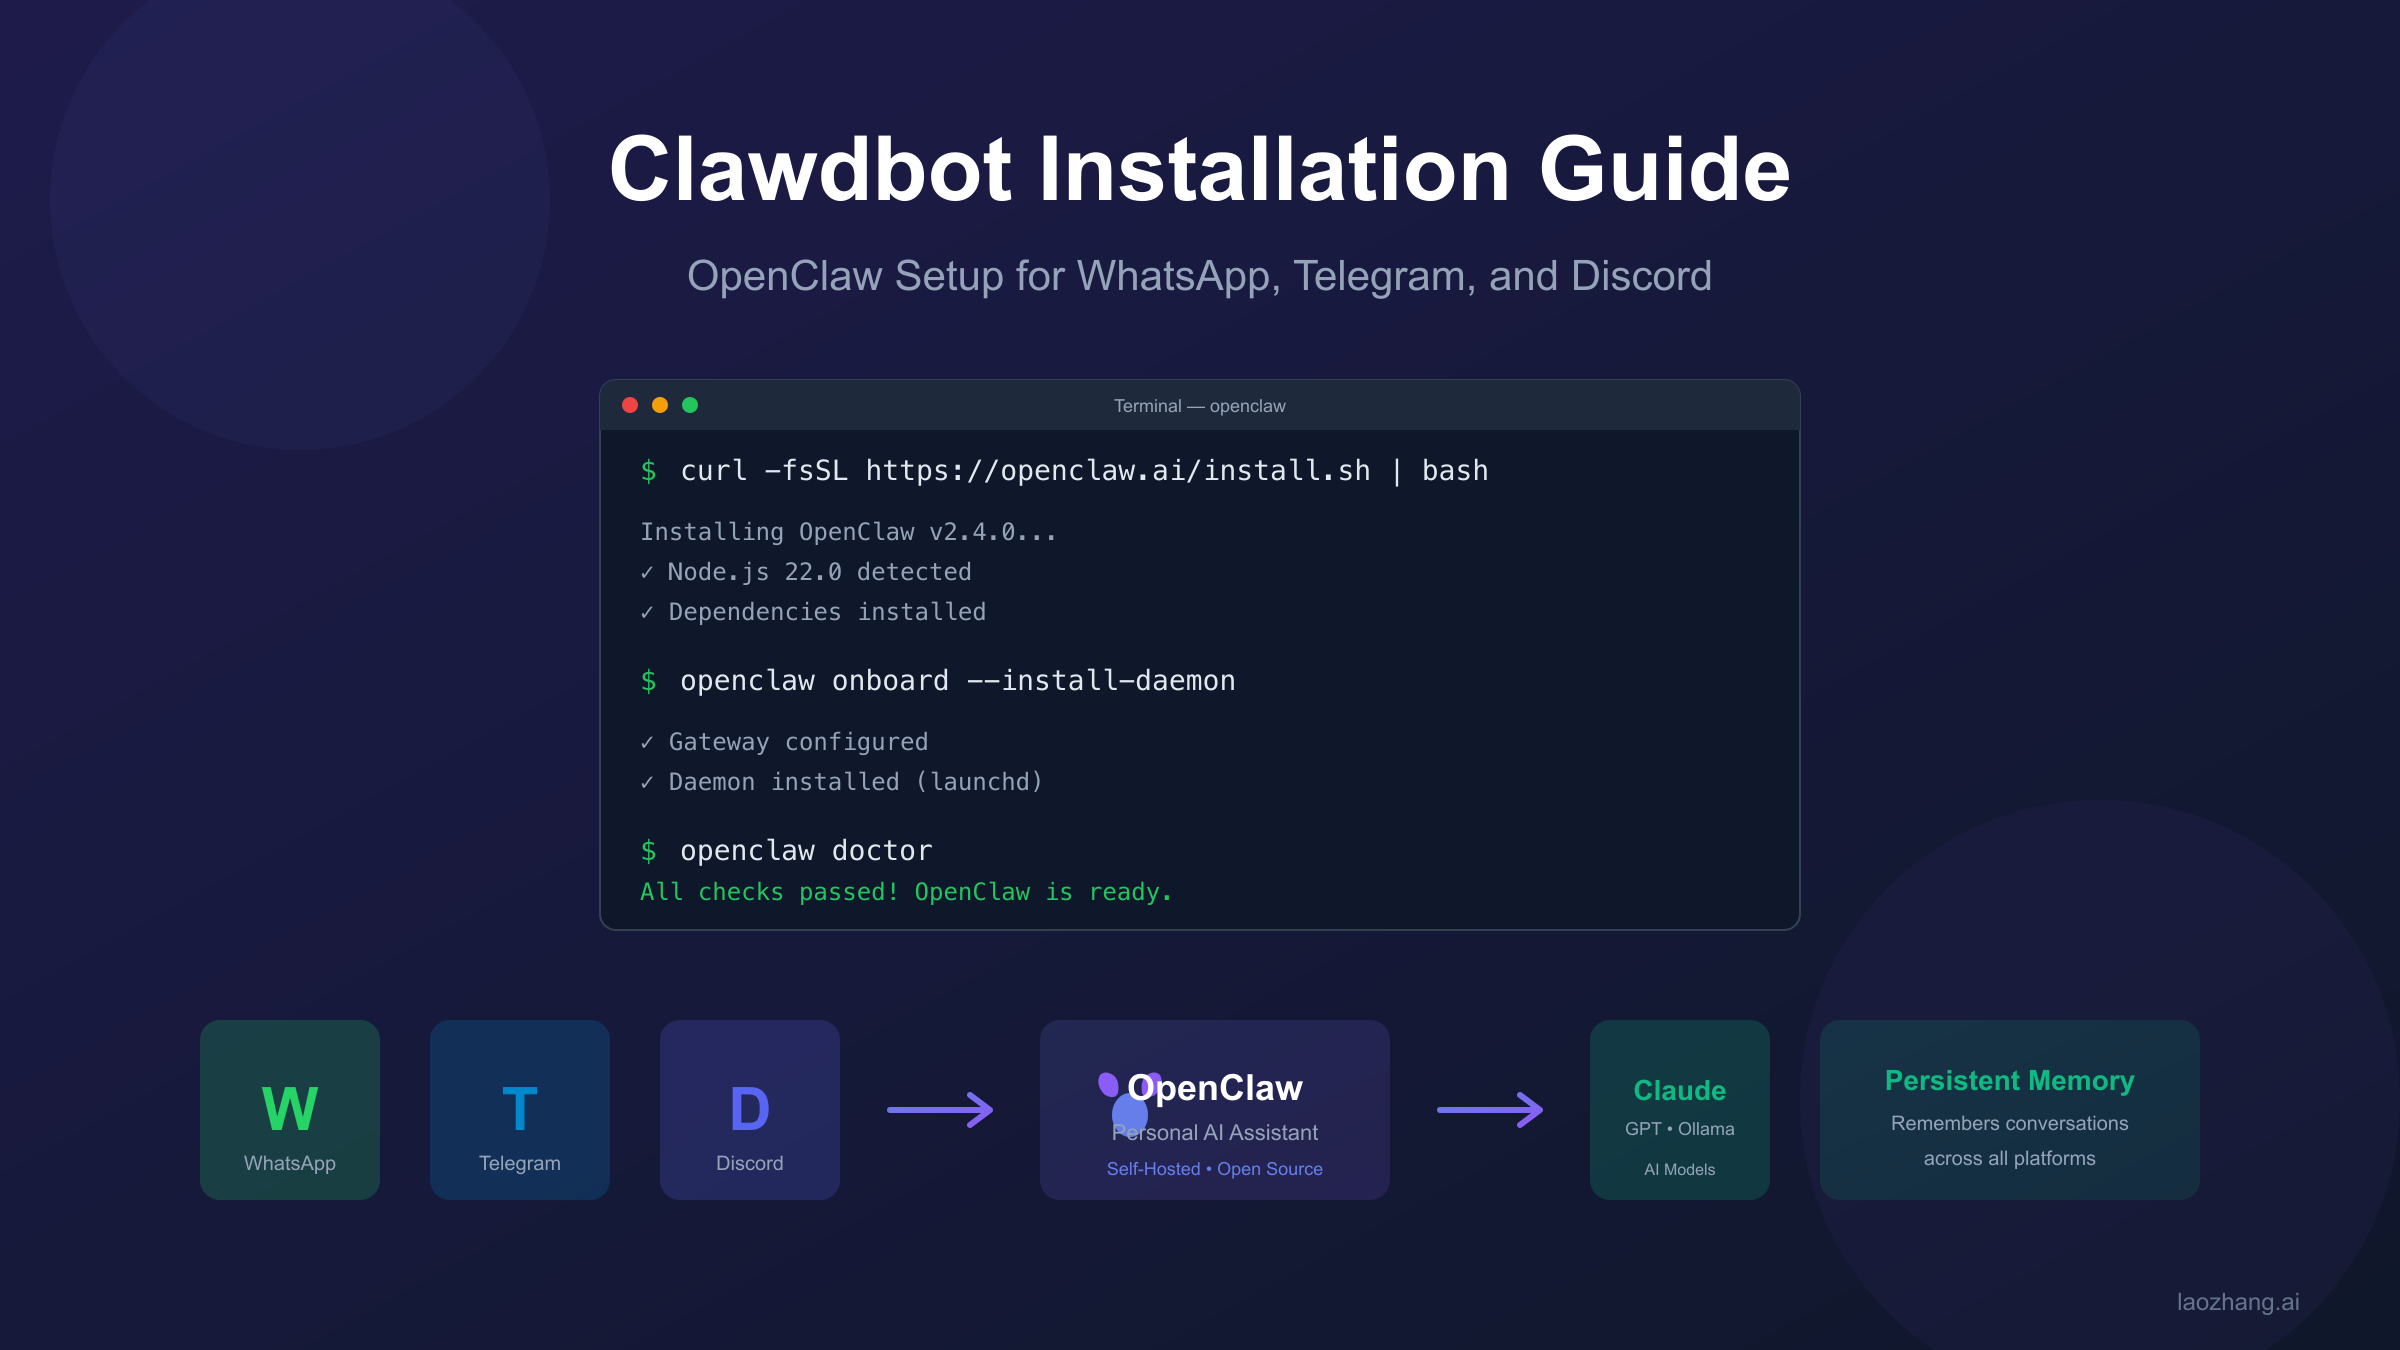
hljs bashcurl -fsSL https://openclaw.ai/install.sh | bash
This command downloads and executes the official installer script. The script checks for Node.js 22+, installs OpenClaw globally, and launches the onboarding wizard. If Node.js is missing or outdated, the script will notify you and exit, allowing you to address prerequisites before retrying.
hljs bashopenclaw onboard --install-daemon
The onboarding wizard walks you through essential configuration: choosing your AI model provider (Anthropic Claude recommended), setting up authentication, connecting your first messaging channel, and optionally installing the background daemon. When prompted about daemon installation, select "Yes" to have OpenClaw start automatically on system boot.
hljs bashopenclaw doctor
The doctor command verifies your installation, checks configuration validity, and identifies common issues. A healthy installation shows all checks passing. If any checks fail, the output includes specific remediation steps.
After completing these three steps, OpenClaw is running and ready to receive messages. The wizard will have guided you through connecting at least one messaging channel (WhatsApp, Telegram, or Discord), and you can send your first message through that channel to verify everything works.
For Windows users on WSL2, open Ubuntu from the Start menu first, then run these same commands within the Linux environment. The daemon will run within WSL2, so ensure WSL2 is configured to start automatically if you want always-on availability.
If you prefer npm installation over the curl script, the equivalent commands are:
hljs bashnpm install -g openclaw@latest openclaw onboard --install-daemon openclaw doctor
The official OpenClaw documentation contains additional configuration options and detailed explanations of each onboarding step. The GitHub repository hosts the source code, issue tracker, and community discussions.
Platform-Specific Setup Guide
While the quick start commands work across platforms, each operating system has specific considerations for optimal setup. This section provides detailed guidance for macOS, Linux, Windows WSL2, and Docker deployments.
macOS Installation
macOS provides the smoothest OpenClaw experience, particularly on Apple Silicon Macs. The system daemon uses launchd for automatic startup, and configuration files live in predictable locations.
Start by verifying Node.js 22+ is installed. Homebrew users can run brew install node for the latest version. After running the installer or npm install, the onboarding wizard handles most configuration, but understanding file locations helps with troubleshooting.
Configuration files reside in ~/.openclaw/openclaw.json. Logs write to ~/.openclaw/logs/gateway.log. The workspace directory at ~/.openclaw/workspace stores skills, agent configurations, and persistent data. The launchd daemon plist installs to ~/Library/LaunchAgents/com.openclaw.gateway.plist.
For Mac Mini dedicated server setups, consider enabling automatic login and disabling sleep so the machine remains available. Energy Saver preferences let you prevent sleep when the display is off, ensuring 24/7 availability without keeping the screen active.
Linux Installation
Linux installations use systemd for daemon management on most distributions. Ubuntu 22.04+ and Debian 12+ are extensively tested, though any distribution with Node.js 22+ support should work.
After installation, the systemd service file typically installs to ~/.config/systemd/user/openclaw-gateway.service. Enable it with systemctl --user enable openclaw-gateway and start with systemctl --user start openclaw-gateway. Checking status uses systemctl --user status openclaw-gateway.
For server deployments without a desktop environment, ensure the user service can run at boot without login by enabling lingering: sudo loginctl enable-linger $USER. This crucial step allows your OpenClaw instance to start automatically even when no one is logged in.
Windows WSL2 Installation
Windows support requires WSL2 with Ubuntu, not native Windows. Install WSL2 through PowerShell with wsl --install, which sets up Ubuntu by default. Restart when prompted, then open Ubuntu from the Start menu.
Inside WSL2, install Node.js using nvm (Node Version Manager) for easier version management:
hljs bashcurl -o- https://raw.githubusercontent.com/nvm-sh/nvm/v0.40.0/install.sh | bash
source ~/.bashrc
nvm install 22
Then proceed with the standard installation commands. Note that WSL2 must be running for OpenClaw to function. Configure WSL2 to start automatically by adding it to Windows startup applications or using Task Scheduler.
Docker Installation
Docker deployment provides the strongest isolation and works well for VPS environments where you want clear boundaries between OpenClaw and your host system.
Clone the repository and run the setup script:
hljs bashgit clone https://github.com/openclaw/openclaw.git
cd openclaw
./docker-setup.sh
The script builds the Docker image, runs the onboarding wizard in a container, and starts the gateway via Docker Compose. Configuration persists to ~/.openclaw/ on the host through volume mounts.
After setup, access the web dashboard at http://127.0.0.1:18789/. The gateway token printed during setup grants access to the control panel. For remote VPS access, configure a reverse proxy with authentication rather than exposing the port directly.
Docker Compose configuration supports additional customization through environment variables. Set OPENCLAW_EXTRA_MOUNTS to mount additional host directories, or OPENCLAW_DOCKER_APT_PACKAGES to install system packages inside the container during build.
Connecting Your Messaging Channels
OpenClaw supports multiple messaging platforms, each with its own authentication mechanism. You can connect several channels simultaneously, maintaining a unified AI assistant accessible from any platform.
WhatsApp Setup
WhatsApp connection uses the linked devices feature, similar to WhatsApp Web. During onboarding or by running openclaw channels login, you'll see a QR code in your terminal.
Open WhatsApp on your phone, go to Settings, then Linked Devices, then Link a Device. Scan the QR code displayed in your terminal. Once linked, your OpenClaw instance receives messages sent to your WhatsApp number.
For security, configure an allowlist of phone numbers permitted to message your bot. In ~/.openclaw/openclaw.json, add numbers in E.164 format under channels.whatsapp.allowFrom. Messages from unlisted numbers receive a pairing code but won't be processed until you approve them with openclaw pairing approve whatsapp <code>.
A known issue caused WhatsApp to mass-message contacts when certain edge conditions were met. If you previously experimented with configuration, ensure old sessions are cleared before production use. The community has addressed this in recent releases, but reviewing your WhatsApp permissions and testing with a secondary number first remains prudent.
Telegram Setup
Telegram uses a bot token from BotFather, Telegram's official bot management service. Open Telegram and start a chat with @BotFather. Send /newbot and follow the prompts to create a new bot and receive your token.
Configure the token via environment variable or config file. For environment variable: export TELEGRAM_BOT_TOKEN=your-token-here. For config file, add to ~/.openclaw/openclaw.json:
hljs json{
"channels": {
"telegram": {
"botToken": "your-token-here"
}
}
}
Note that Telegram bots default to Privacy Mode, only receiving messages when directly mentioned or in private chats. For group functionality where the bot should see all messages, add it as a group administrator.
If you see setMyCommands failures in logs, verify outbound HTTPS access to api.telegram.org. Some networks or VPS providers block or throttle Telegram API endpoints.
Discord Setup
Discord requires creating an application in the Discord Developer Portal. Create a new application, add a bot user, and copy the bot token.
Critical step: Enable privileged intents in the Bot settings. You must enable MESSAGE CONTENT INTENT to read message text in guild channels. Without this, the bot connects but cannot see message content. SERVER MEMBERS INTENT is optional but helpful for member lookups.
Generate an invite URL under OAuth2, selecting the bot and applications.commands scopes. For permissions, select at minimum: View Channels, Send Messages, Read Message History, Embed Links, and Attach Files.
Configure the token in your environment or config file, then invite the bot to your server using the generated URL. The gateway starts the Discord channel automatically when a token is available.
For DM conversations, the default pairing security applies. Unknown users receive a pairing code. Approve with openclaw pairing approve discord <code> to add them to your allowlist.
Security Configuration Best Practices
Security deserves early attention, not afterthought treatment. OpenClaw grants significant capabilities to an AI agent, potentially including shell access, file system access, and messaging on your behalf. Proper configuration limits blast radius when things go wrong.
The fundamental security model follows a principle of layers: identity first (who can talk to the bot), scope next (where the bot can act), and model last (assume the model can be manipulated). This ordering matters because even if an attacker manipulates the AI through prompt injection, properly configured identity and scope limits prevent serious damage.
Authentication is non-negotiable. The gateway requires authentication by default. If you're seeing "no auth configured" errors, re-run onboarding. Never expose the gateway port publicly without authentication. On VPS deployments, security scans have found many OpenClaw instances running with gateway ports open and zero authentication, exposing API keys, email access, and file permissions directly to the internet.
Pairing provides DM protection. The default dmPolicy="pairing" setting means unknown senders receive a short pairing code and their messages aren't processed until approved. Resist the temptation to set dmPolicy="open" unless you fully understand the implications. An open policy means anyone who discovers your WhatsApp number or Telegram bot can start interacting with your AI assistant and consuming your API credits.
Allowlists beat denylists. Rather than trying to block bad actors, explicitly allow known contacts. Configure allowFrom lists for each channel with the specific users or numbers permitted to interact. This positive security model means new attackers are blocked by default rather than requiring you to detect and block each one.
Sandbox non-primary sessions. For group chats or channels where multiple users interact, enable sandbox mode by setting agents.defaults.sandbox.mode: "non-main" in your configuration. This runs non-primary sessions inside Docker containers with restricted permissions, limiting what a compromised session can access on your host system.
Disable mDNS for exposed gateways. OpenClaw broadcasts presence information via mDNS by default, which helps local discovery but reveals infrastructure details to anyone on your network. For VPS or exposed deployments, set OPENCLAW_DISABLE_BONJOUR=1 or configure minimal mDNS mode.
Treat skill folders as trusted code. Skills execute with full access to OpenClaw's capabilities. Only install skills from trusted sources, review skill code before installation, and restrict who can modify your ~/.openclaw/workspace/skills directory.
Prompt injection remains an unsolved problem across all AI systems. Even with strong system prompts, attackers can craft messages that manipulate the model into taking unintended actions. Your security configuration should assume the model will eventually be tricked and limit what damage that can cause. Hard enforcement through tool policies, execution approvals, and sandboxing provides defense when soft guardrails fail.
Daemon Setup for Always-On Operation
Running OpenClaw continuously requires proper daemon configuration so the gateway survives reboots and runs without requiring manual intervention.
The onboarding wizard handles daemon installation when you select "Yes" for background service installation. For manual setup or troubleshooting, understanding the underlying mechanism helps.
macOS (launchd): The gateway installs as a LaunchAgent at ~/Library/LaunchAgents/com.openclaw.gateway.plist. Load it with launchctl load ~/Library/LaunchAgents/com.openclaw.gateway.plist and unload with the corresponding unload command. View status with launchctl list | grep openclaw. Logs stream to ~/.openclaw/logs/gateway.log.
Linux (systemd): The user service file at ~/.config/systemd/user/openclaw-gateway.service manages the gateway. After any service file changes, reload with systemctl --user daemon-reload. Enable automatic start with systemctl --user enable openclaw-gateway. Critical for servers: enable lingering for your user with sudo loginctl enable-linger $USER so services start at boot without login.
Docker: With Docker Compose, the restart: unless-stopped policy ensures the container restarts automatically after crashes or reboots. The host Docker daemon must be configured to start on boot, which is the default on most systems.
Verifying daemon status uses platform-specific commands. On macOS, openclaw gateway status queries the launchd service. On Linux, systemctl --user status openclaw-gateway shows whether the service is active. For Docker, docker compose ps lists container states.
If the daemon seems stuck or unresponsive, force restart with openclaw gateway --force. This terminates existing processes and starts fresh. Check logs at ~/.openclaw/logs/gateway.log for error messages that might explain the issue.
Recent releases fixed an issue where the daemon couldn't reinstall after being uninstalled, due to persisted launchd disabled state. If you've previously uninstalled and are having trouble reinstalling, the current version handles this automatically.
API Costs and Optimization
OpenClaw itself is free and open-source, but the AI models powering it carry API costs that can add up quickly. Understanding real-world cost patterns helps you budget appropriately and implement optimization strategies.
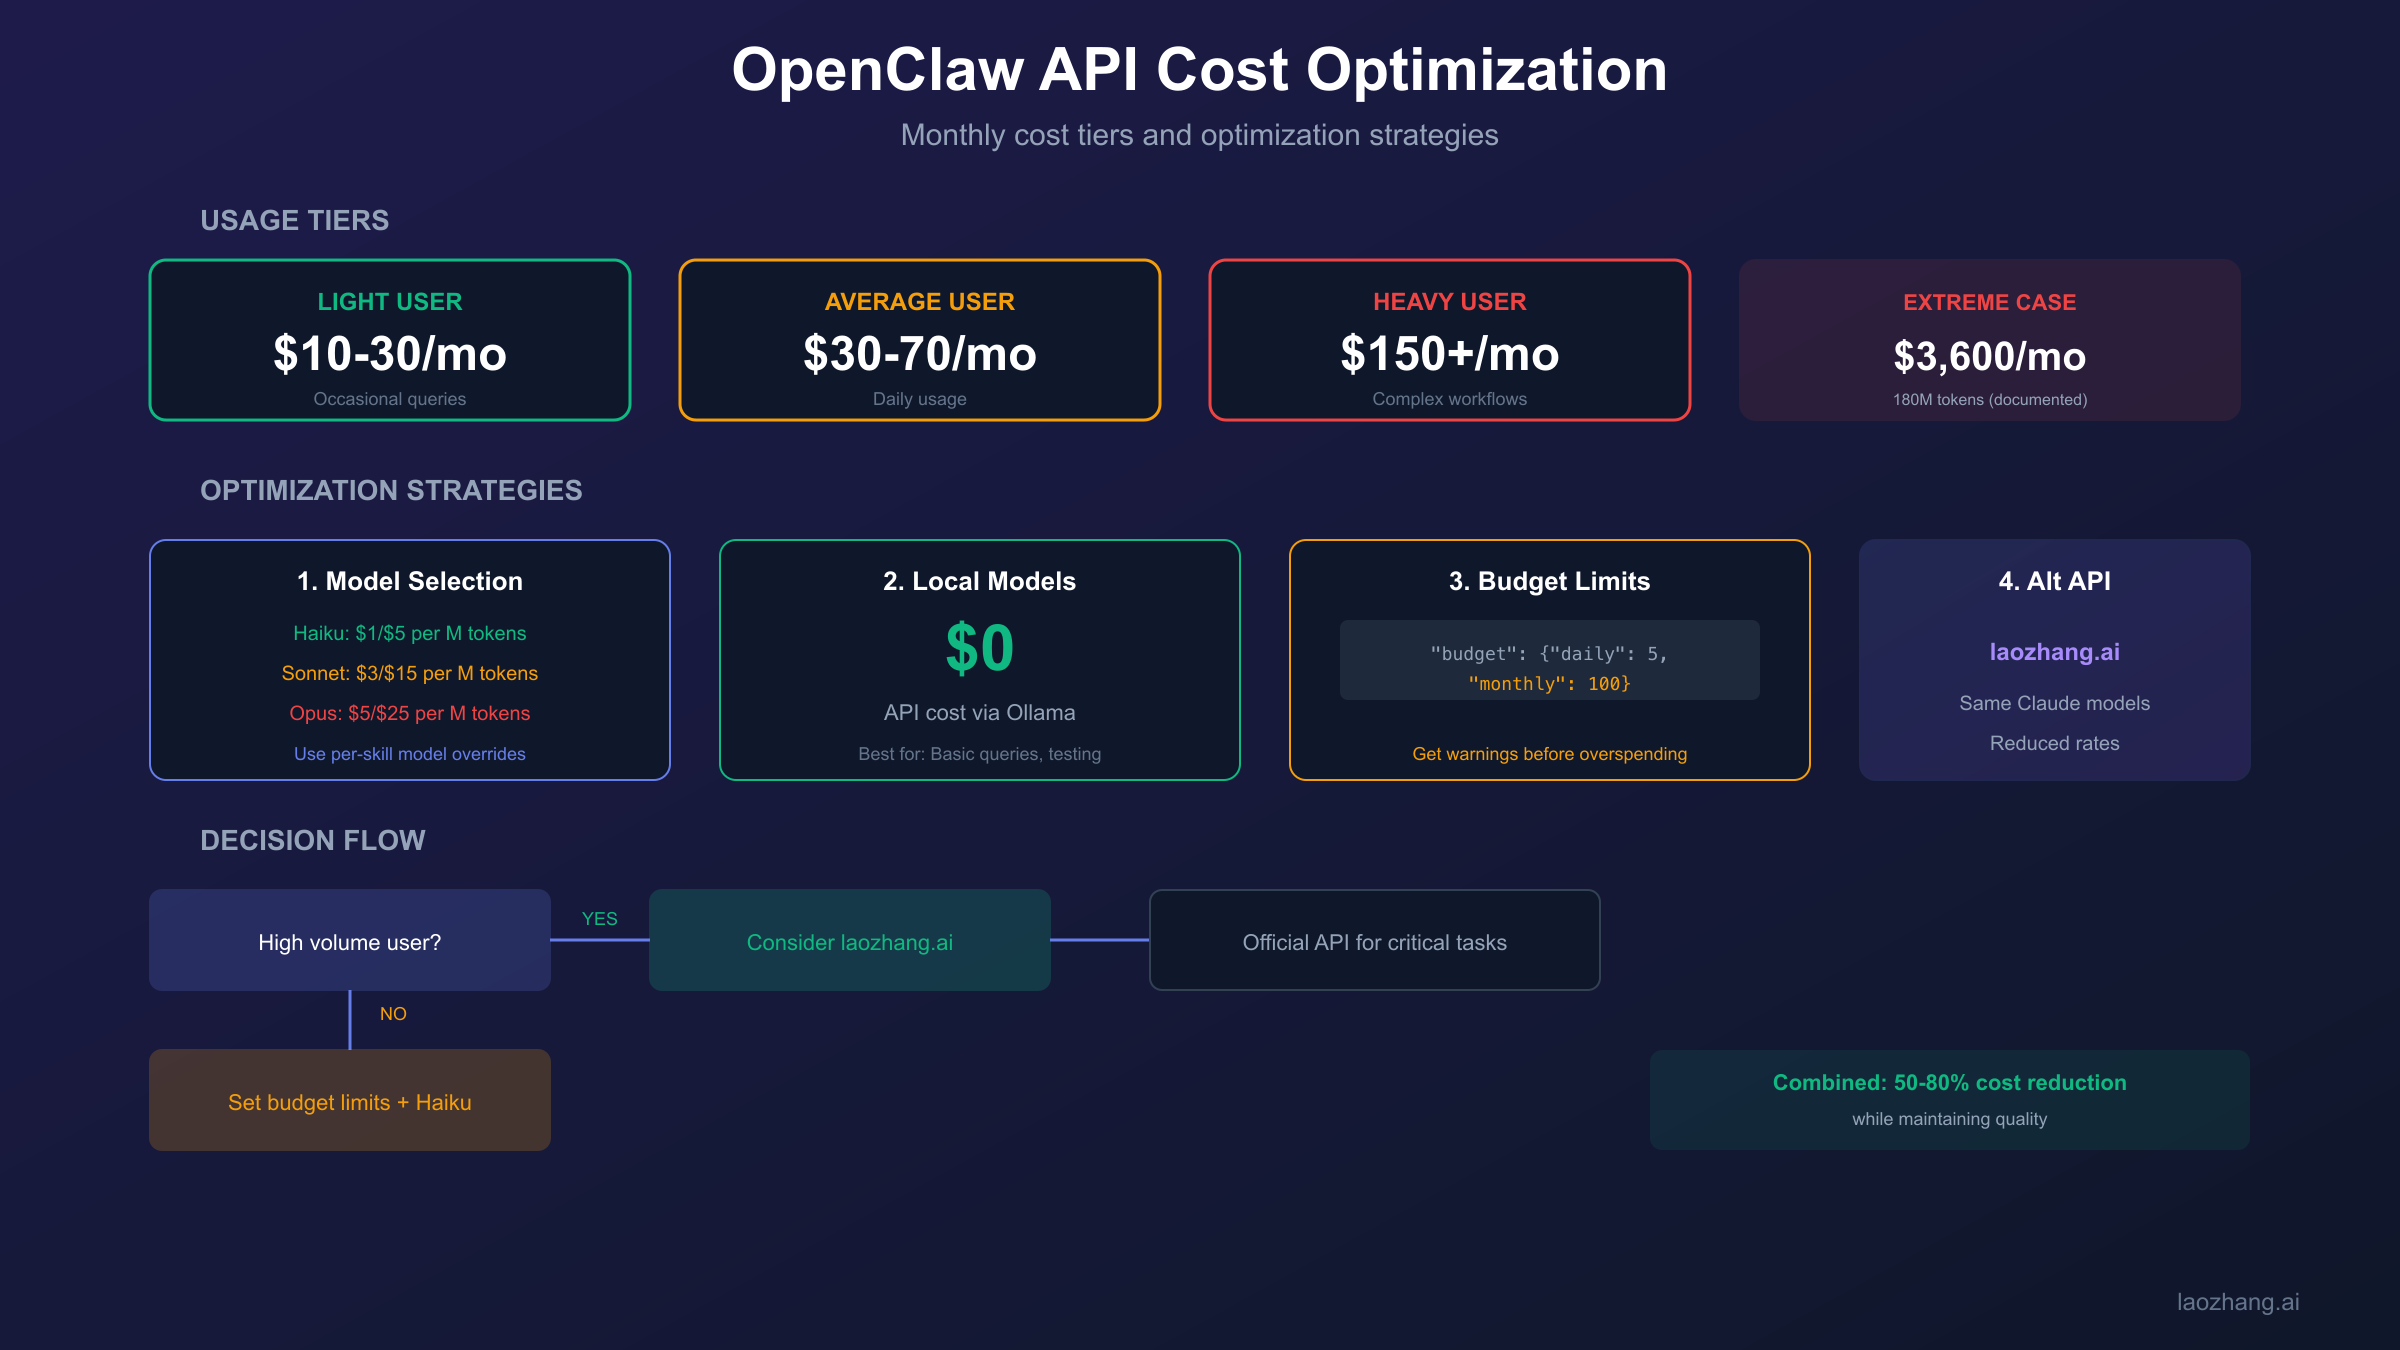
Based on community reports and documented usage patterns, typical monthly costs break down across several tiers. Light users performing occasional queries and simple automations spend approximately $10-30 monthly. Average users with regular daily interaction and moderate automation see $30-70 monthly costs. Heavy users running complex workflows, extensive coding assistance, and proactive features often exceed $150 monthly.
The extreme end of the spectrum demonstrates what's possible when automation runs unchecked. MacStories editor Federico Viticci reported burning through 180 million tokens in his first month of intensive use, translating to roughly $3,600 at Claude Sonnet rates. Another community member spent $200 in a single day due to a runaway automation loop that kept triggering API calls.
Anthropic Claude API pricing (official rates as of early 2026). For detailed pricing breakdowns, see our Claude Opus 4.5 pricing guide:
| Model | Input | Output | Best For |
|---|---|---|---|
| Claude Haiku 4.5 | $1/M tokens | $5/M tokens | Simple tasks, high volume |
| Claude Sonnet 4.5 | $3/M tokens | $15/M tokens | Balanced performance |
| Claude Opus 4.5 | $5/M tokens | $25/M tokens | Complex reasoning |
Important: Using Claude Pro or Max subscriptions with OpenClaw violates Anthropic's Terms of Service. You must use API keys with pay-as-you-go pricing.
Cost optimization strategies:
Model selection matters significantly. Configure OpenClaw to use Haiku for simple tasks and reserve Sonnet or Opus for complex operations. The configuration supports per-skill model overrides, so routine queries can use cheaper models while coding assistance uses more capable ones.
Local models eliminate API costs entirely for tasks where quality tradeoffs are acceptable. Install Ollama and configure OpenClaw to route certain conversations to local models. You'll sacrifice capability for cost elimination, but for basic queries and drafts, local models often suffice.
Implement rate limiting and budgets. The OpenClaw configuration supports daily and monthly spending caps. Set conservative limits initially and adjust based on actual usage patterns. Receiving a budget warning is far better than discovering an unexpectedly large bill.
Audit and prune automations. Proactive features that trigger API calls on schedules can quietly accumulate costs. Review your configured automations periodically and disable any that aren't delivering proportional value.
For high-volume users seeking cost optimization without sacrificing quality, third-party API providers offer Claude model access at reduced rates. Services like laozhang.ai provide the same Claude models through alternative endpoints at lower per-token costs. Configuration requires only swapping the API base URL and key in your OpenClaw settings. The tradeoff involves using a third-party service, so verify current availability and evaluate whether the cost savings justify the additional dependency for your use case.
Verification and Testing
After installation, systematic verification ensures everything works correctly before relying on OpenClaw for important tasks.
Step 1: Run diagnostics
hljs bashopenclaw doctor
The doctor command checks Node.js version, configuration validity, daemon status, and network connectivity. All checks should pass. Failed checks include specific error messages and remediation suggestions.
Step 2: Verify gateway status
hljs bashopenclaw gateway status
The output should indicate the gateway is running and listening on the expected port (default 18789). If using Docker, also verify with docker compose ps that the container is healthy.
Step 3: Access the web dashboard
Open http://127.0.0.1:18789/ in your browser. You'll need the gateway token from your initial setup. The dashboard shows connected channels, active sessions, and configuration options. Being able to load the dashboard confirms the gateway is accepting connections.
Step 4: Test messaging channel
Send a test message through your configured channel (WhatsApp, Telegram, or Discord). A simple "Hello" should receive a response within a few seconds. If using pairing, you may need to approve your own number first.
Step 5: Verify persistent features
Tell the assistant something to remember, close the conversation, then start a new session and ask if it remembers. This tests that persistent memory is functioning correctly.
Step 6: Run security audit
hljs bashopenclaw security audit --deep
The security audit checks for common misconfigurations, exposed ports, and authentication issues. Address any warnings before production use.
If any test fails, check logs at ~/.openclaw/logs/gateway.log for error messages. Common issues include network connectivity to API endpoints, expired or invalid tokens, and permission problems on configuration files.
Troubleshooting Common Issues
Even careful installations encounter problems. This section covers the most frequently reported issues and their solutions.
"node: command not found"
Node.js isn't installed or isn't in your PATH. Install Node.js 22+ from nodejs.org or via your package manager. After installation, close and reopen your terminal for PATH changes to take effect.
"openclaw: command not found"
The npm global bin directory isn't in your PATH. Run npm bin -g to find the directory, then add it to your shell's startup file (.bashrc, .zshrc, or equivalent). On macOS with Homebrew Node, the path is typically /opt/homebrew/bin.
Gateway won't start
Run openclaw doctor to identify the specific failure. Common causes include another process using port 18789 (check with lsof -i :18789), invalid configuration JSON syntax, or missing API keys.
"no auth configured"
Re-run openclaw onboard and complete the authentication setup. The gateway refuses to start without authentication configured as a security measure.
Bot connected but not responding
Usually a pairing issue. Check openclaw pairing list <channel> for pending requests and approve your own number/user with openclaw pairing approve <channel> <code>. Also verify the model API key is valid and has sufficient credits.
WhatsApp QR code scanning fails
Try these steps in order: restart the gateway with openclaw gateway --force, clear any existing WhatsApp linked device sessions, ensure your phone has a stable internet connection, and retry the QR scan. Some users report success after switching between Wi-Fi and cellular data.
Telegram "Used disallowed intents" error
You haven't enabled Message Content Intent in the Discord Developer Portal. Go to your application, select Bot from the sidebar, scroll to Privileged Gateway Intents, and enable MESSAGE CONTENT INTENT.
Docker container immediately exits
Check container logs with docker compose logs openclaw-gateway. Common causes include missing environment variables (especially OPENCLAW_GATEWAY_TOKEN), permission issues on mounted volumes, or insufficient memory.
Out of memory during npm install
Increase available RAM to 2GB or configure swap space. For temporary workaround, set NODE_OPTIONS="--max-old-space-size=1024" before running npm install.
For issues not covered here, the OpenClaw GitHub Issues page contains searchable community reports, and the project Discord has active support channels. If you encounter API-related errors, our Claude API error code guide may help diagnose the issue.
Updates and Maintenance
Keeping OpenClaw updated ensures you have the latest features, security patches, and bug fixes. The update process depends on your installation method.
npm/pnpm installations:
hljs bashnpm update -g openclaw@latest openclaw gateway --force
The gateway force restart ensures the new version loads. Check the changelog before updating for any breaking changes requiring configuration updates.
Installer script installations:
Re-running the installer downloads and installs the latest version:
hljs bashcurl -fsSL https://openclaw.ai/install.sh | bash
Docker installations:
Pull the latest image and recreate containers:
hljs bashcd ~/openclaw
git pull
docker compose pull
docker compose up -d --force-recreate
From source installations:
hljs bashcd ~/openclaw
git pull
pnpm install
pnpm build
openclaw gateway --force
Backup before updating: Export your configuration and workspace before major updates. The configuration at ~/.openclaw/openclaw.json and workspace at ~/.openclaw/workspace contain your customizations and persistent data. A simple copy to a backup location protects against update issues.
Monitor the changelog: The GitHub releases page documents changes between versions. Breaking changes are noted and include migration instructions. Subscribe to release notifications to stay informed.
Scheduled maintenance: For always-on deployments, plan periodic restarts even when not updating. Long-running processes can accumulate memory leaks or stale connections. A weekly gateway restart via cron or scheduled task maintains reliability.
Frequently Asked Questions
What Node.js version does OpenClaw require?
OpenClaw requires Node.js version 22 or higher. This is a strict requirement because the codebase uses modern JavaScript features unavailable in earlier versions. Check your version with node --version and upgrade if necessary.
Can I run OpenClaw on Windows without WSL?
Native Windows is officially unsupported and known to have compatibility issues. Windows Subsystem for Linux 2 (WSL2) with Ubuntu is strongly recommended and provides near-native Linux performance. The installation experience and ongoing stability are significantly better under WSL2.
How much does running OpenClaw cost per month?
OpenClaw itself is free and open-source. Costs come from AI model API usage, typically $30-70 monthly for average users. Light users can stay under $30, while heavy automation users may exceed $150. Costs scale with usage volume and model selection.
Is my data safe with OpenClaw?
OpenClaw runs entirely on your own infrastructure, so your conversations never reach third-party servers except the AI model provider (Anthropic, OpenAI, etc.). Enable proper authentication, use pairing for unknown contacts, and configure allowlists for maximum security. Prompt injection remains an unsolved industry-wide challenge, so configure conservative tool permissions.
How do I connect OpenClaw to WhatsApp?
Run openclaw channels login and scan the displayed QR code using WhatsApp's Linked Devices feature on your phone. The process is identical to connecting WhatsApp Web. Your phone must maintain an internet connection for WhatsApp to relay messages.
Can I use my Claude Pro subscription instead of API credits?
No. Using Claude Pro, Max 5x, or Max 20x subscriptions with OpenClaw violates Anthropic's Terms of Service. You must use API keys with pay-as-you-go pricing. The subscription products are licensed for direct interface use only.
What happens if I exceed my API budget?
Configure spending limits in OpenClaw's settings to receive warnings before hitting thresholds. If you exceed your API provider's credits without a payment method, API calls fail and the assistant stops responding until credits are replenished or payment is configured.
This comprehensive clawdbot installation guide has walked you through every step from system requirements to production deployment. OpenClaw represents a genuinely new category of AI tool, one that respects your privacy, learns your preferences, and integrates into your existing communication workflows. While the setup requires more effort than cloud services, the control and customization you gain make it worthwhile for users who value data ownership and persistent AI assistance.
Whether you're running OpenClaw on a dedicated Mac Mini at home, a VPS in the cloud, or a Docker container on your development machine, you now have the knowledge to install, configure, secure, and maintain your personal AI assistant. The community around this project remains active and welcoming, so don't hesitate to seek help in the Discord server or GitHub discussions when you encounter challenges beyond this guide.