OpenClaw Installation Error: Complete Fix Guide for All Platforms (2026)
Fix OpenClaw installation errors on macOS, Windows, and Linux. Covers Node.js version issues, Sharp/node-gyp failures, PATH configuration, and step-by-step solutions for every common error.
Nano Banana Pro
4K-80%Google Gemini 3 Pro · AI Inpainting
谷歌原生模型 · AI智能修图

Installing OpenClaw should be straightforward, but the reality is that installation failures are among the most common barriers preventing developers from using this powerful AI gateway. Whether you're seeing Node.js version errors, Sharp build failures on macOS, or the dreaded "command not found" after installation, this guide provides systematic solutions for every platform.
The single most important prerequisite for OpenClaw installation is Node.js version 22 or higher. Running node --version before attempting installation will save you from the most common failure scenario. If your version is below 22, upgrading Node.js should be your first step—not troubleshooting error messages.
This comprehensive guide walks through platform-specific installation methods, diagnoses common errors by their exact messages, and provides tested solutions. Whether you're installing fresh or migrating from the older Clawdbot or Moltbot packages, you'll find the steps you need to get OpenClaw running successfully.
Prerequisites and System Requirements
Before attempting any OpenClaw installation, verify your system meets these requirements to avoid wasting time on doomed attempts. Many installation failures happen because users skip this verification step and jump straight to npm install.
Node.js version 22 or higher is the non-negotiable requirement. OpenClaw uses modern JavaScript features including ES modules and nullish coalescing that simply don't exist in older Node versions. Check your current version by running node --version in your terminal. If you see anything below v22, you must upgrade first.
For Node.js version management, the recommended approach is using nvm (Node Version Manager) on macOS and Linux, or fnm (Fast Node Manager) on Windows. These tools allow you to install and switch between Node versions without affecting system-wide configurations. Installing the latest LTS version with nvm install 22 ensures compatibility.
Platform requirements vary significantly. macOS users need version 14 (Sonoma) or later for the desktop app installer, though the npm installation method works on older versions. Windows users must use WSL2 (Windows Subsystem for Linux)—native Windows installation is explicitly unsupported and will encounter numerous issues. Linux users have the most straightforward path, though Ubuntu, Debian, and Fedora are the officially tested distributions.
Additional dependencies include npm (included with Node.js) and Git for some installation methods. macOS users may also need Xcode Command Line Tools, installable via xcode-select --install. These tools provide the compiler infrastructure needed for native modules like Sharp.
The pre-flight checklist before installation should verify Node.js version (≥22), npm functionality (npm --version), and sufficient disk space (at least 500MB). Running node -e "console.log(process.version)" confirms your Node.js is working correctly and reporting the expected version.
Choosing the Right Installation Method
The installation method you choose significantly impacts both success rate and troubleshooting complexity. Not all methods work equally well on all platforms, and choosing wrong leads to avoidable errors.
For most users on macOS and Linux, the official curl installer provides the highest success rate because it handles dependencies and PATH configuration automatically. The command curl -fsSL https://openclaw.ai/install.sh | bash downloads and executes the installer script, which detects your platform, installs the appropriate package, and configures your shell.
The npm global installation (npm install -g openclaw@latest) offers more control but requires manual PATH configuration. This method works well for developers who already have a properly configured Node.js environment. However, it's also the method most likely to encounter permission errors and PATH issues.
Docker installation provides the most isolated and reproducible environment, ideal for server deployments and users who want to avoid any system-level changes. Running docker pull openclaw/openclaw followed by docker run commands gives you a containerized OpenClaw instance that won't interfere with your local environment.
Building from source by cloning the GitHub repository is only recommended for contributors who need to modify the code. This method requires pnpm, additional development dependencies, and familiarity with the build process. Unless you're actively developing OpenClaw, avoid this path.
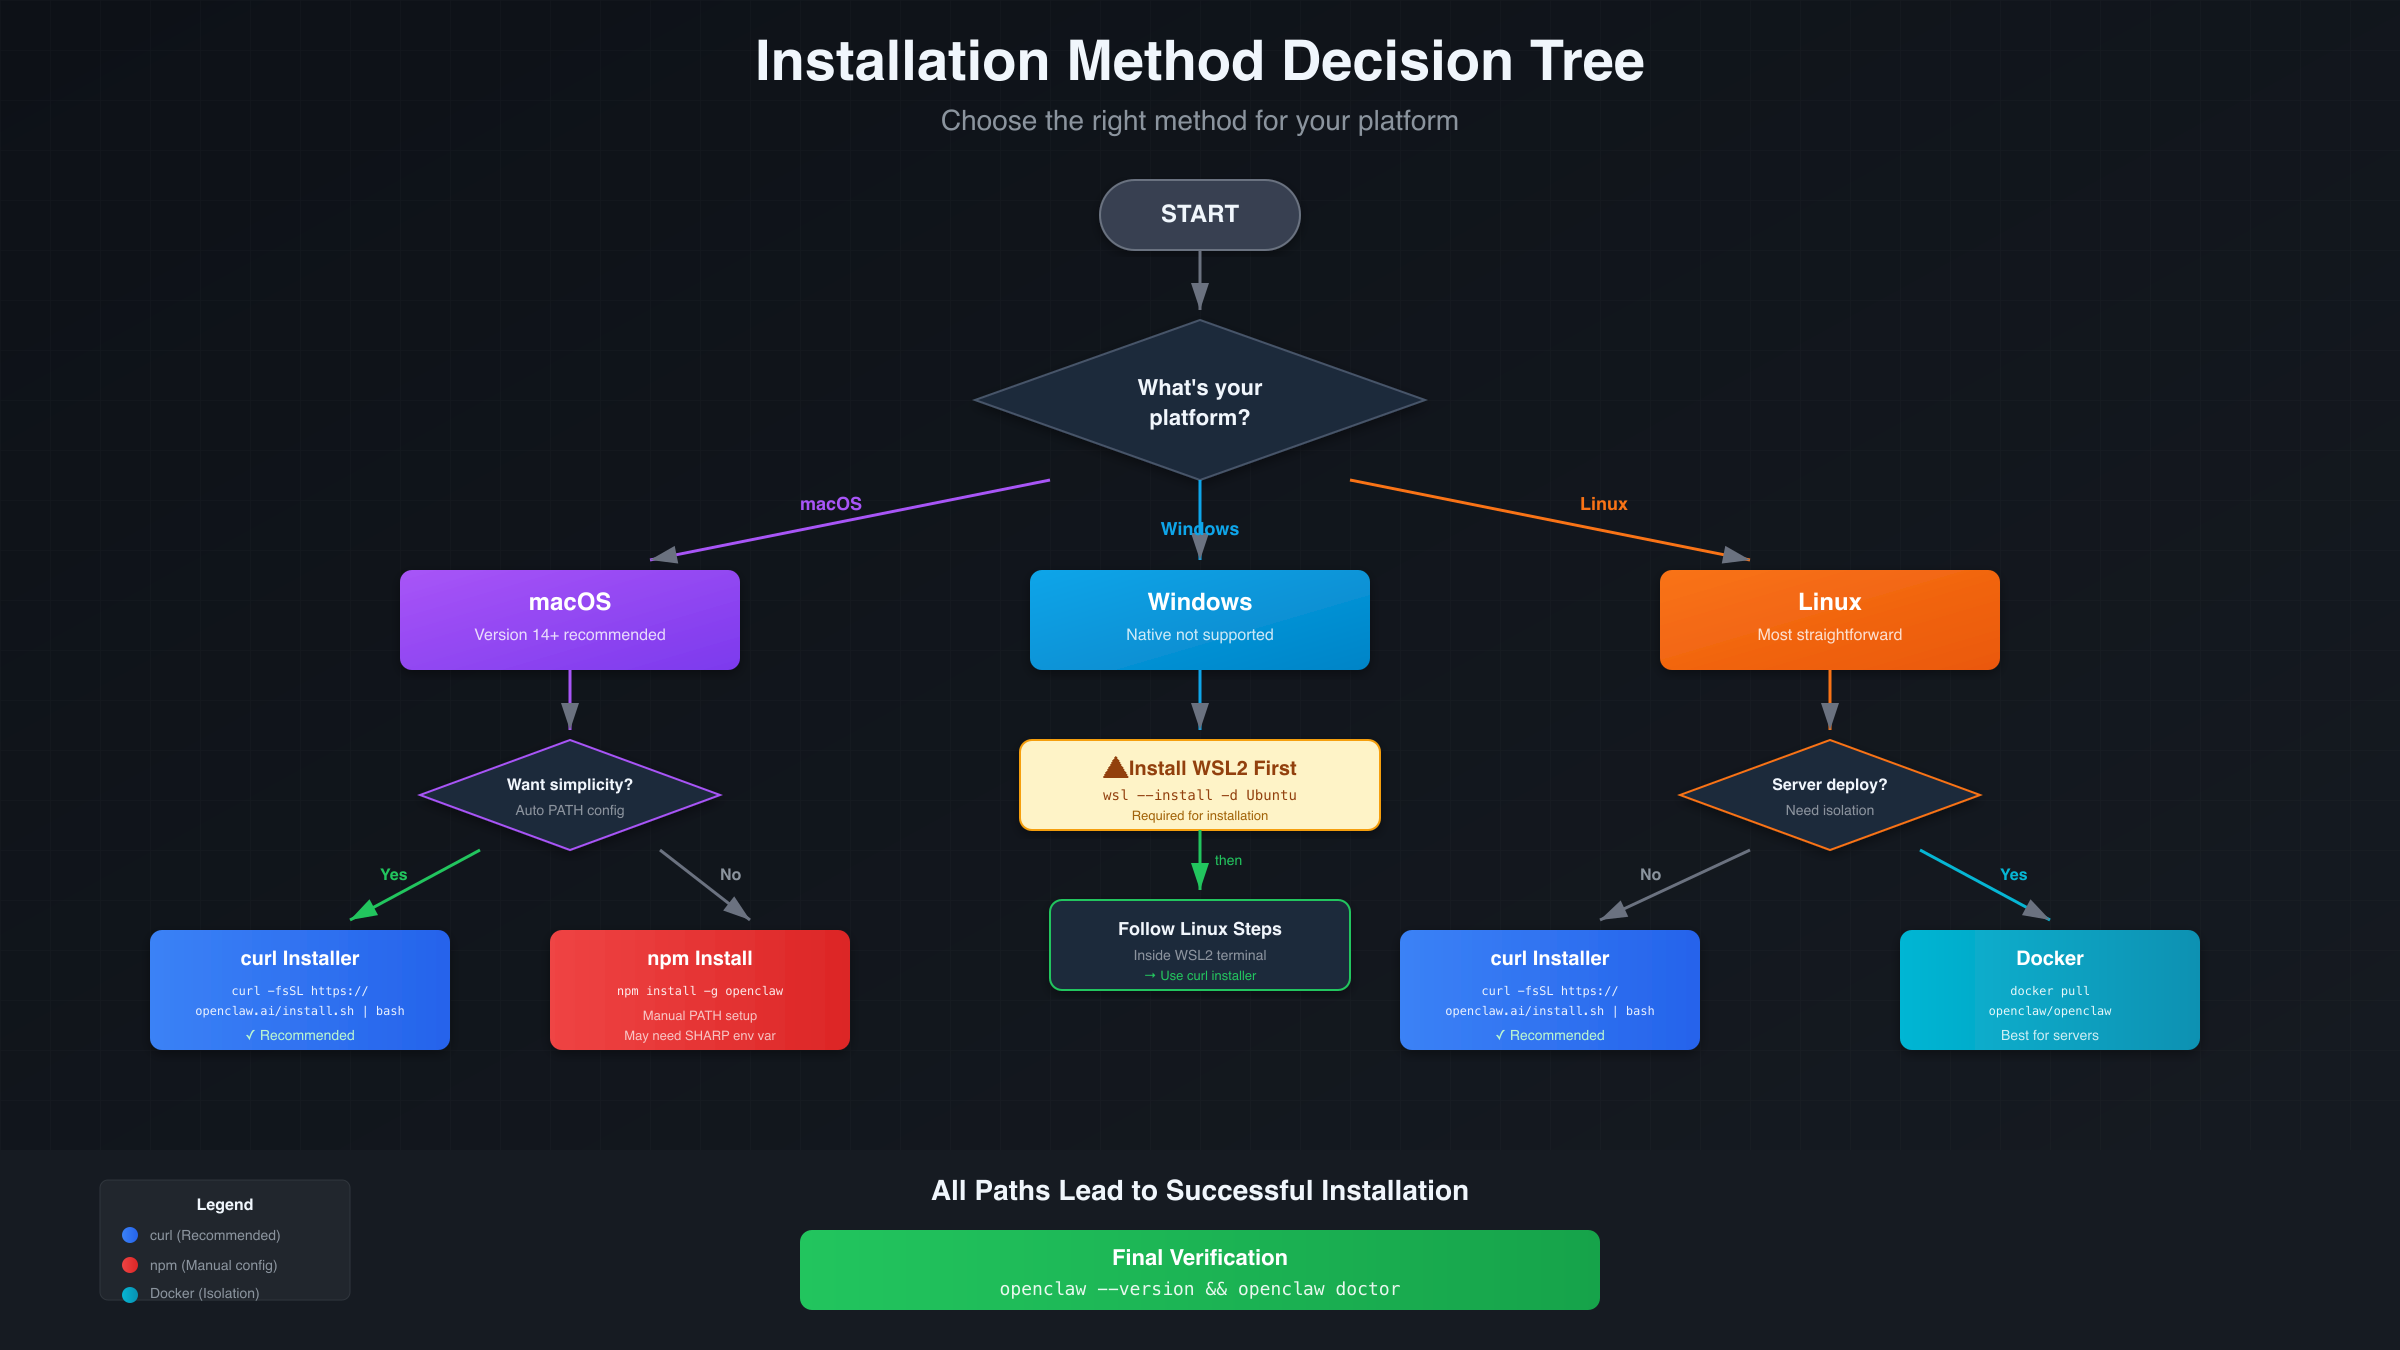
The decision tree for choosing methods is straightforward. If you're on Windows, use WSL2 and then follow Linux instructions. If you want simplicity and automatic configuration, use the curl installer. If you need fine-grained control or are already comfortable with npm global packages, use npm install. If you're deploying to a server or want complete isolation, use Docker.
Node.js Version Errors
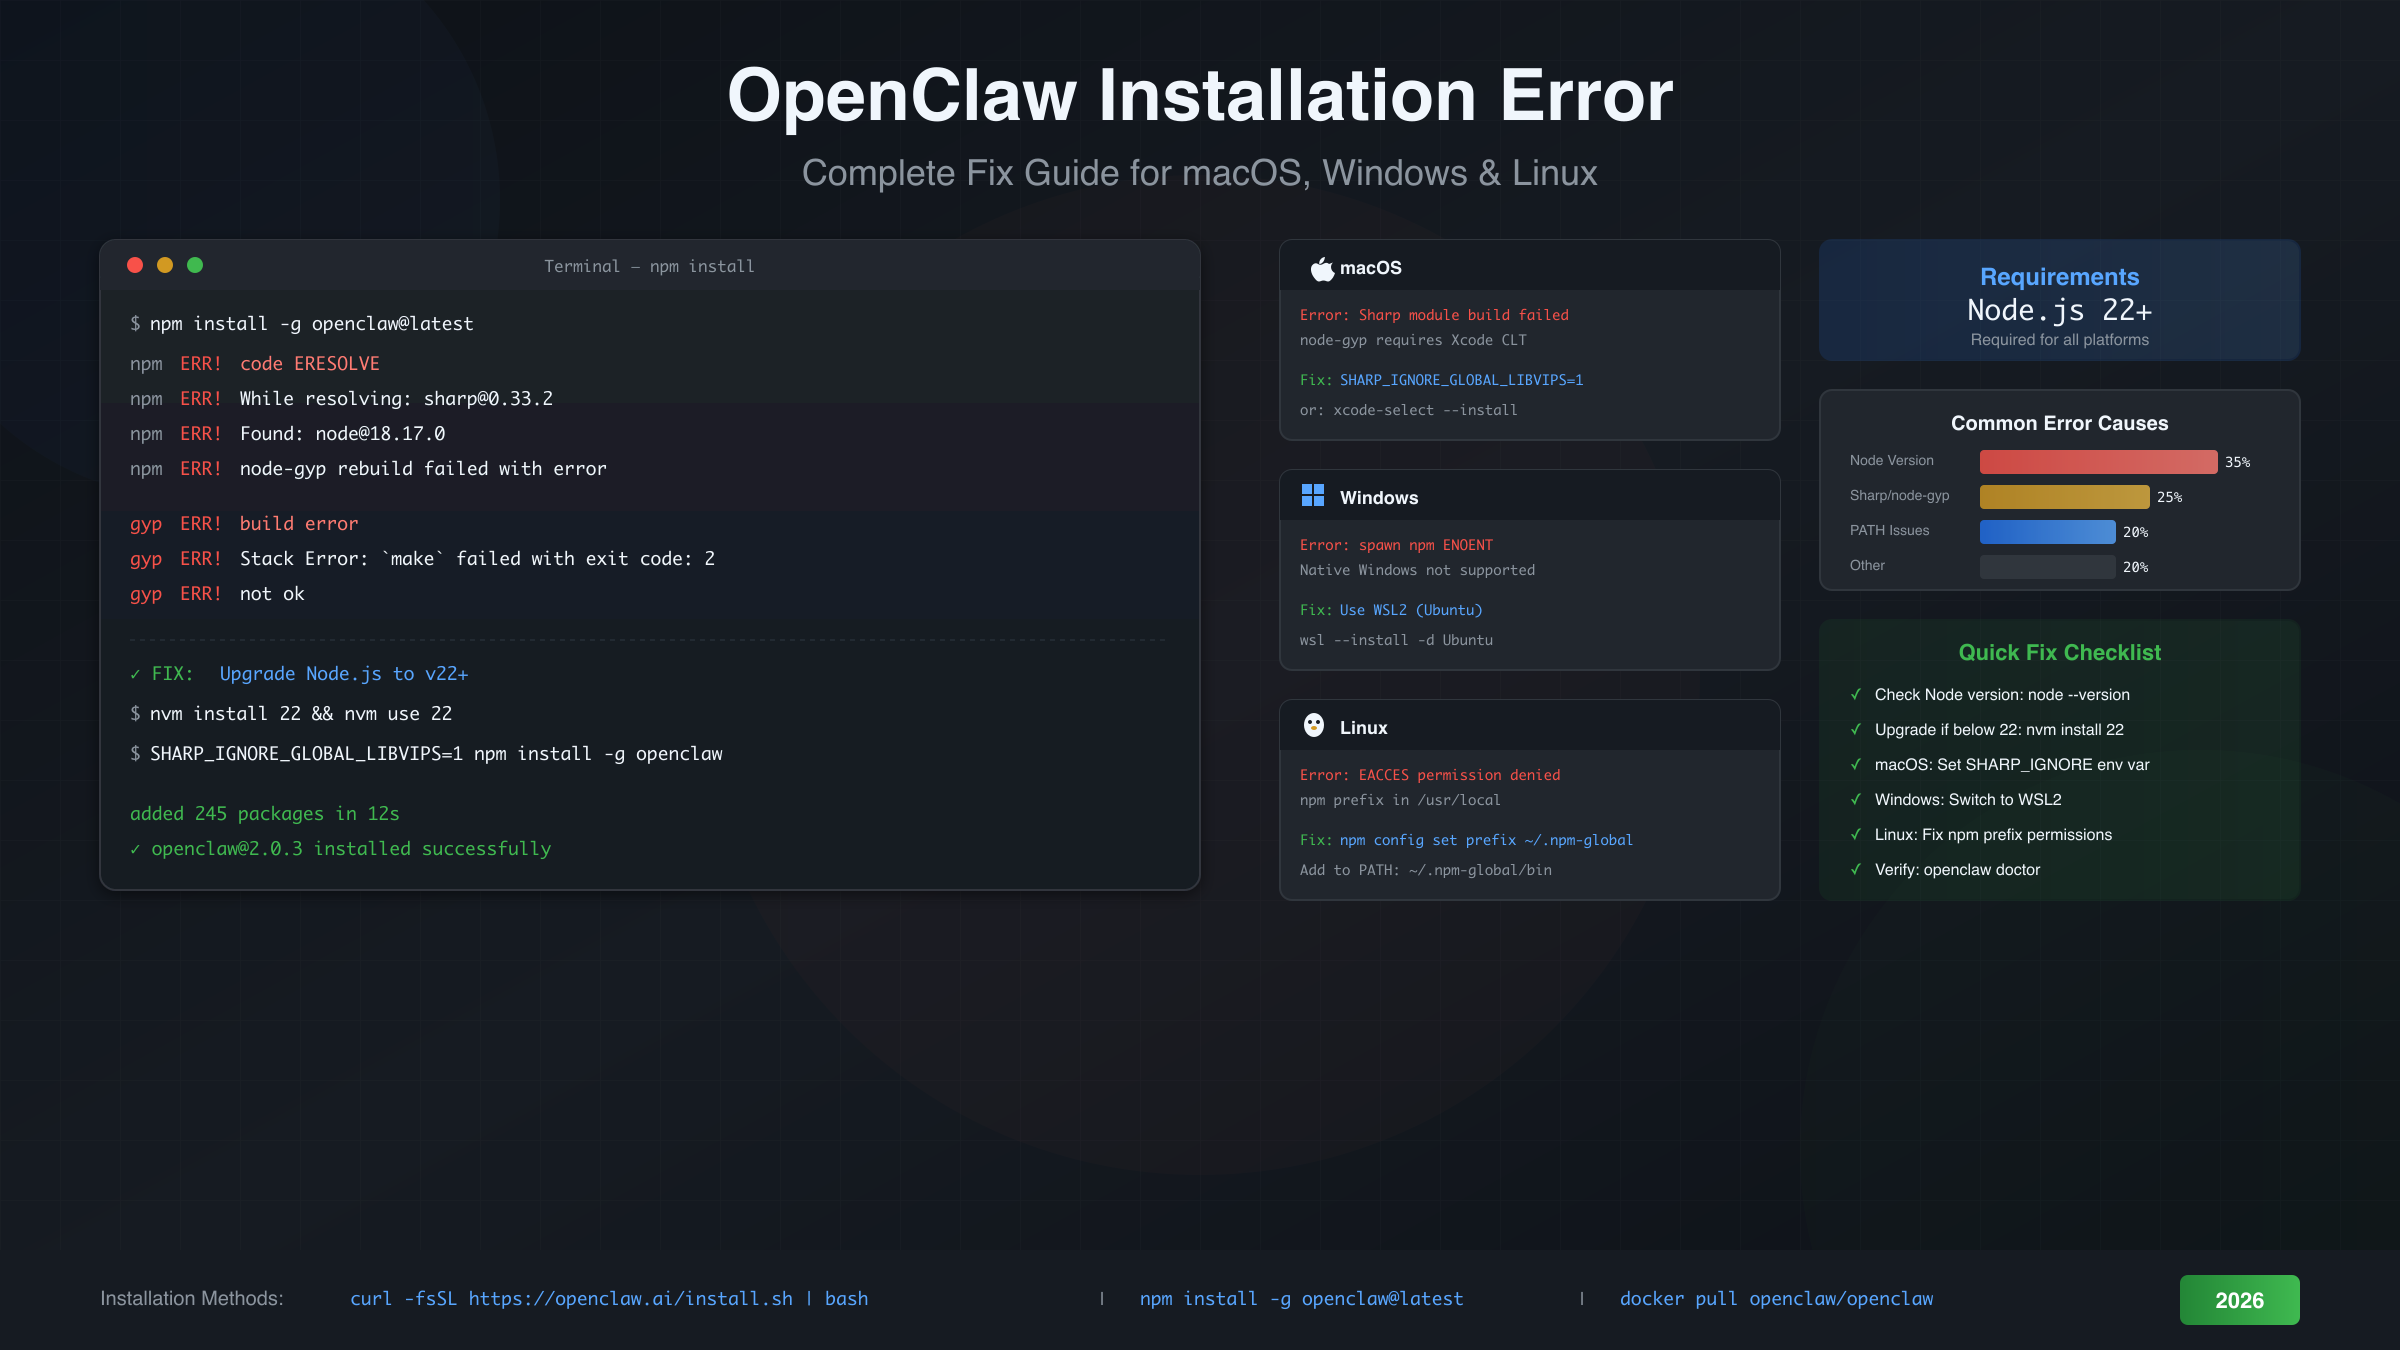
Node.js version incompatibility causes approximately 35% of all OpenClaw installation failures, making it the single most common issue. The error messages aren't always obvious about the root cause, which leads users to troubleshoot in the wrong direction.
The symptoms of version problems vary. You might see syntax errors about nullish coalescing (??), optional chaining (?.), or BigInt literals. You might encounter "unexpected token" errors during installation or runtime. In some cases, the installation completes but OpenClaw crashes immediately on first run with confusing stack traces.
Diagnosing the problem is simple: run node --version and compare against the minimum requirement of v22. Many systems come with older Node.js versions pre-installed, and PATH configurations might point to an outdated version even if you've installed a newer one.
The recommended fix involves using a version manager rather than replacing your system Node.js. On macOS and Linux, install nvm with curl -o- https://raw.githubusercontent.com/nvm-sh/nvm/v0.39.0/install.sh | bash, restart your terminal, then run nvm install 22 and nvm use 22. Setting the default with nvm alias default 22 ensures new terminal sessions use the correct version.
On Windows (within WSL2), the same nvm commands work. Alternatively, fnm provides similar functionality with better Windows integration: winget install Schniz.fnm followed by fnm install 22 and fnm use 22.
After upgrading, verify the change took effect by running node --version again. If it still shows the old version, check your PATH variable and shell configuration files (.bashrc, .zshrc, or .profile) to ensure the version manager's path comes before any system paths.
A common pitfall occurs when multiple Node installations exist. System package managers (apt, brew, chocolatey) might install a separate Node.js that shadows the version manager's installation. Use which node (Linux/macOS) or where node (Windows) to see which binary is actually being executed.
PATH Configuration Issues
When OpenClaw installs successfully but openclaw: command not found appears, the problem is almost always PATH configuration. This error frustrates users because the installation reported success, yet the command doesn't work.
Understanding the issue requires knowing how npm global packages work. When you run npm install -g openclaw, npm places the executable in a directory that varies by platform and configuration. On Unix-like systems, this is typically ~/.npm-global/bin or the system's /usr/local/bin. However, your shell only finds commands in directories listed in the PATH environment variable.
The diagnostic command npm prefix -g reveals where npm is installing global packages. The bin subdirectory of this path should appear in your PATH. Running echo $PATH (Linux/macOS) or $env:PATH (PowerShell) shows your current PATH configuration.
The fix for most Unix systems involves adding the npm global bin directory to your PATH. Add this line to your shell configuration file (~/.bashrc for bash, ~/.zshrc for zsh):
hljs bashexport PATH="$(npm prefix -g)/bin:$PATH"
After adding this line, run source ~/.bashrc or source ~/.zshrc to apply the change to your current session. New terminal windows will automatically include the updated PATH.
For systems where npm's global prefix points to a system directory requiring root permissions, the better solution is changing the prefix to a user-writable location. Create the directory with mkdir ~/.npm-global, configure npm with npm config set prefix '~/.npm-global', and then add ~/.npm-global/bin to your PATH as described above.
The curl installer typically handles all this automatically, which is why it's recommended for users who encounter PATH issues with manual npm installation. If you've struggled with PATH configuration, consider uninstalling the npm-installed OpenClaw and using the curl installer instead.
macOS Sharp and node-gyp Errors
macOS users frequently encounter Sharp and node-gyp build failures that stop installation cold. These native module compilation errors produce intimidating log output that sends users searching for solutions in all directions.
Sharp is an image processing library that OpenClaw uses internally. It depends on libvips, a native library that must be compiled for your specific platform. When this compilation fails, you'll see errors mentioning "node-gyp," "gyp ERR!," or "Please add node-gyp to your dependencies."
The most reliable fix uses an environment variable that tells Sharp to use a pre-built binary instead of compiling from source. Run the installation with:
hljs bashSHARP_IGNORE_GLOBAL_LIBVIPS=1 npm install -g openclaw@latest
This bypasses the local compilation by downloading pre-built binaries for your platform. The environment variable can also be set permanently in your shell configuration if you frequently install packages with Sharp dependencies.
If the pre-built binary approach fails, installing Xcode Command Line Tools provides the necessary compiler infrastructure:
hljs bashxcode-select --install
This downloads Apple's development tools, including the clang compiler and related headers that node-gyp needs for building native modules.
On Apple Silicon Macs (M1, M2, M3, M4), ensure you're running a native ARM version of Node.js rather than an x86 version through Rosetta. Check with node -p "process.arch"—it should show arm64. If it shows x64, reinstall Node.js using the ARM64 installer or through a version manager that properly detects your architecture.
A less common but persistent issue involves corrupted npm cache affecting native module installation. Running npm cache clean --force before attempting installation again can resolve mysterious build failures that persist despite trying other fixes.
The relationship between these errors and system updates deserves mention. macOS major version upgrades (like moving from Monterey to Sonoma) often invalidate compiled native modules and Xcode tools. After any major system upgrade, running xcode-select --install again ensures your tools are compatible with the new OS version.
Windows Installation Problems
Windows presents unique challenges for OpenClaw installation because native Windows is explicitly not supported. Attempting to install directly in PowerShell or Command Prompt leads to errors that have no direct fixes—the solution is switching to WSL2.
The official documentation states Windows is "untested, more problematic" for native installation. Common symptoms include "spawn npm ENOENT" errors, execution policy blocks, and native module compilation failures. Rather than troubleshooting these individually, the recommended path is using WSL2 to create a Linux environment within Windows.
Installing WSL2 requires Windows 10 version 2004 or later (or Windows 11). From an administrative PowerShell, run:
hljs powershellwsl --install -d Ubuntu
This installs the WSL2 infrastructure and Ubuntu distribution. After installation completes and you've set up a username and password, you'll have a Linux environment where OpenClaw installs normally following Linux instructions.
For users who must use native Windows (perhaps due to corporate restrictions preventing WSL2), some workarounds exist but come with caveats. Setting the PowerShell execution policy with Set-ExecutionPolicy RemoteSigned -Scope CurrentUser addresses one category of errors. Installing Windows Build Tools with npm install -g windows-build-tools provides some native compilation capability. However, expect ongoing issues that the OpenClaw team doesn't officially support.
If you've previously attempted native Windows installation before switching to WSL2, clean up remnants that might cause conflicts. Uninstall any globally installed npm packages, remove %AppData%\npm and %AppData%\npm-cache directories, and ensure no OpenClaw-related entries exist in your Windows PATH before starting fresh in WSL2.
Within WSL2, the installation follows standard Linux procedures. Install Node.js 22 using nvm, verify with node --version, and then use either the curl installer or npm install. The WSL2 environment handles all the Unix-specific requirements that native Windows lacks.
One common confusion involves accessing OpenClaw's gateway from Windows browsers or applications while running the server in WSL2. The gateway binds to localhost within WSL2, which maps to the Windows host's localhost. Connections from Windows applications to localhost:18789 should work transparently, though firewall configurations occasionally require adjustment.
Linux Permission and Service Errors
Linux installation typically succeeds but permission errors and service configuration issues can prevent proper operation. Understanding npm's permission model and systemd integration helps resolve these problems efficiently.
The EACCES permission error during npm install -g happens when npm's global prefix points to a root-owned directory while you're running as a non-root user. The error message includes a path like /usr/local/lib/node_modules and mentions "permission denied."
The fix involves changing npm's global prefix to a user-owned directory rather than running npm with sudo (which creates other problems). Execute these commands:
hljs bashmkdir ~/.npm-global
npm config set prefix '~/.npm-global'
export PATH=~/.npm-global/bin:$PATH
Add the PATH export to your shell configuration file for persistence. After making these changes, npm install -g openclaw@latest installs to your home directory without requiring elevated permissions.
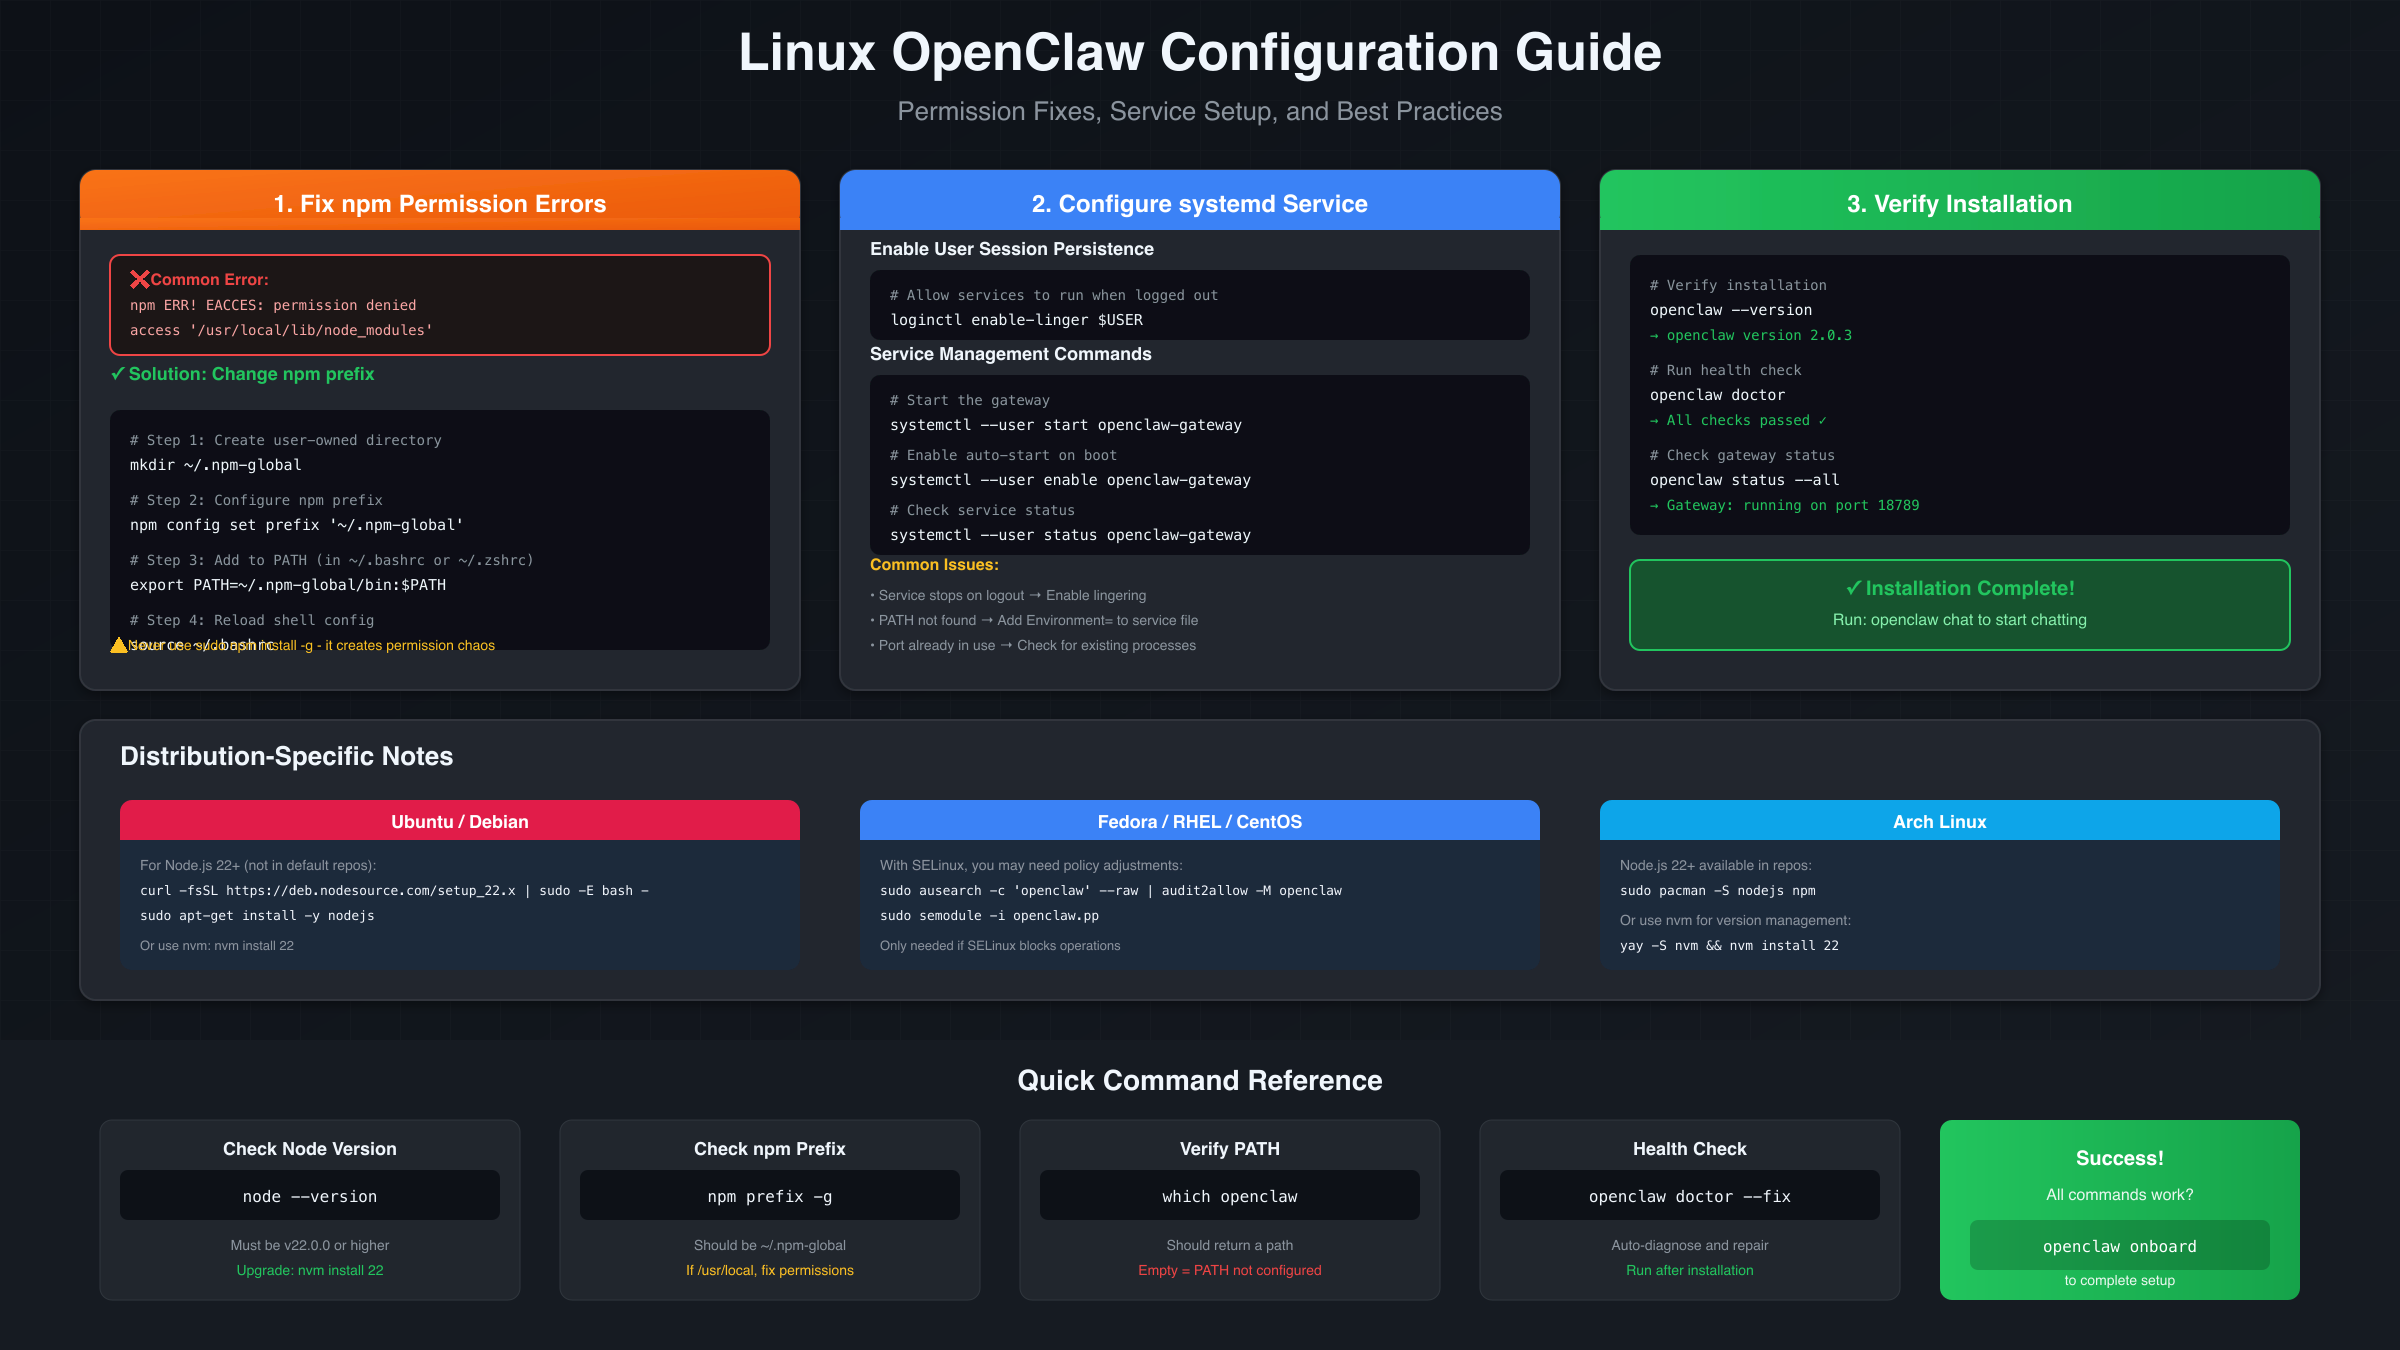
Systemd service configuration enables OpenClaw's gateway to run persistently and start automatically on boot. The user service approach (recommended over system services) requires enabling lingering:
hljs bashloginctl enable-linger $USER
Without lingering enabled, user services stop when you log out, even if they're configured for automatic restart. The OpenClaw gateway service file typically installs to ~/.config/systemd/user/, and you control it with systemctl --user start openclaw-gateway.
Service startup failures often relate to environment variables not being available in the systemd context. The PATH that includes your npm global bin directory might not be present when systemd starts the service. Adding Environment="PATH=..." to the service file or using absolute paths ensures the service finds necessary binaries.
For distributions using SELinux (Fedora, RHEL, CentOS), additional configuration may be necessary if the gateway fails to bind to its port or access configuration files. The audit2allow tool can generate appropriate SELinux policy rules from denied operation logs.
Ubuntu users on older LTS releases might have outdated Node.js in the default repositories. The NodeSource repository provides current Node.js versions: curl -fsSL https://deb.nodesource.com/setup_22.x | sudo -E bash - adds the repository, after which sudo apt-get install -y nodejs installs Node.js 22.
Post-Installation Verification
A successful installation isn't confirmed until OpenClaw responds correctly to verification commands. Many users assume installation succeeded because npm didn't report errors, only to discover problems during first use.
The essential verification command is:
hljs bashopenclaw --version
This should print the installed version number. If you see "command not found," revisit the PATH configuration section. If you see a version number but it's unexpectedly old, you may have multiple installations with the older one taking precedence in your PATH.
The doctor command performs comprehensive health checks:
hljs bashopenclaw doctor
This examines your configuration, checks for common issues, and reports any problems found. A clean report shows green checkmarks for all checks. Any warnings or errors indicate specific areas needing attention before proceeding.
If doctor reports issues, the fix flag attempts automatic repairs:
hljs bashopenclaw doctor --fix
This modifies configuration files to resolve detected problems, creating backups before making changes. Review the changes afterward, especially if any API keys or sensitive values were modified.
The onboarding wizard helps configure OpenClaw for first use:
hljs bashopenclaw onboard
This interactive command walks through initial setup including API key configuration for various providers, gateway settings, and usage preferences. Completing onboarding ensures OpenClaw has the credentials needed to actually communicate with AI services.
Finally, verify actual functionality by starting a simple chat:
hljs bashopenclaw chat
If this successfully connects to the gateway and accepts input, your installation is complete. If it fails, note the specific error message—gateway connection failures, authentication errors, and model access issues each have different solutions covered in our OpenClaw troubleshooting guide.
Migrating from Clawdbot or Moltbot
OpenClaw is the current name for software that was previously released as Clawdbot and then Moltbot, and users upgrading from these old names encounter specific issues. The package name changes mean old installations don't upgrade cleanly with npm update. If you're still running the older Clawdbot version, check our Clawdbot installation guide for version-specific information.
The symptoms of running old versions include unrecognized commands, configuration file incompatibilities, and conflicts when both old and new packages exist. You might see errors about duplicate service definitions or conflicting PORT bindings if both versions attempt to run their gateways.
The correct migration procedure removes old packages completely before installing OpenClaw:
hljs bashnpm uninstall -g clawdbot moltbot npm cache clean --force npm install -g openclaw@latest
The cache clean step is important because npm caches package metadata, and old cached data can cause resolution problems when package names change.
Configuration files migrate differently. Your ~/.clawdbot/ or ~/.moltbot/ directory contains settings and credentials that OpenClaw can import, but the import isn't automatic. The openclaw migrate command (if available in your version) handles this conversion. Otherwise, you'll need to reconfigure API keys and preferences using openclaw onboard.
Authentication profiles deserve special attention during migration. API keys stored in the old configuration may use outdated encryption or format. Re-entering keys through the new configuration system ensures they're stored using current security practices.
If you're migrating in an environment where other team members still use the old names, coordinate the transition to avoid conflicts. The gateway port (18789) is shared between all versions, so only one can run at a time. Decide on a cutover time and ensure everyone updates simultaneously.
Old shell aliases or scripts referencing clawdbot or moltbot commands need updating. Search your shell configuration files and any automation scripts for these old names and replace them with openclaw.
Complete Reinstall Procedure
When troubleshooting fails and you need a fresh start, a complete reinstall removes all traces before installing again. This nuclear option resolves issues caused by corrupted state, partial installations, or configuration conflicts.
The cleanup procedure removes both the installed package and all associated data:
hljs bashnpm uninstall -g openclaw clawdbot moltbot
rm -rf ~/.openclaw ~/.clawdbot ~/.moltbot
npm cache clean --force
On Linux, also remove any systemd service files:
hljs bashrm -f ~/.config/systemd/user/openclaw*.service
systemctl --user daemon-reload
On macOS, check for and remove launch agents:
hljs bashrm -f ~/Library/LaunchAgents/com.openclaw.*.plist
launchctl bootout gui/$(id -u) ~/Library/LaunchAgents/com.openclaw.*.plist 2>/dev/null
After cleanup, verify nothing remains by running which openclaw (should return nothing) and checking that the configuration directories don't exist.
Reinstall using your preferred method, but consider switching to the curl installer if you previously used npm and encountered issues. The installer handles many edge cases that manual installation doesn't:
hljs bashcurl -fsSL https://openclaw.ai/install.sh | bash
After fresh installation, run through verification steps: openclaw --version, openclaw doctor, and openclaw onboard. Don't skip onboarding even if you remember your settings—entering them fresh ensures everything is correctly configured for the new installation.
If a complete reinstall still fails, the issue likely lies in your system environment rather than OpenClaw itself. Check for conflicting software, unusual PATH configurations, or system restrictions that might affect Node.js or npm operation. Corporate environments with proxy servers or security software sometimes require additional configuration that's outside OpenClaw's scope. For gateway-specific issues after installation, our Clawdbot gateway troubleshooting guide covers common runtime problems.
FAQ
Why does OpenClaw require Node.js 22 specifically?
OpenClaw uses JavaScript features standardized in ES2022 and later, including private class fields, top-level await, and WeakRefs. Node.js 22 is the minimum version providing stable implementations of all required features. Earlier versions either lack these features entirely or have unstable implementations that cause runtime errors. The development team chose to require a specific version rather than maintain compatibility layers that would add complexity and potential bugs.
Can I install OpenClaw on Windows without WSL2?
Technically possible but not recommended or supported. Native Windows installation encounters numerous issues with native module compilation, path handling, and Unix-specific features that OpenClaw depends on. If corporate policy prevents WSL2 installation, Docker provides an alternative that avoids native Windows issues entirely. Run the official Docker image and interact with it from Windows through the mapped port.
The curl installer failed—how do I see what went wrong?
Download the installer script to examine and run it manually with verbose output:
hljs bashcurl -fsSL https://openclaw.ai/install.sh -o install.sh bash -x install.sh
The -x flag prints each command before execution, showing exactly where the failure occurs. Common issues include network problems fetching dependencies, permission errors creating directories, and missing prerequisites like curl itself.
How do I completely remove OpenClaw from my system?
Run these commands in sequence:
hljs bashnpm uninstall -g openclaw clawdbot moltbot
rm -rf ~/.openclaw ~/.clawdbot ~/.moltbot
rm -f ~/.config/systemd/user/openclaw*.service 2>/dev/null
rm -f ~/Library/LaunchAgents/com.openclaw.*.plist 2>/dev/null
Also remove any PATH modifications from your shell configuration files and any aliases referencing openclaw commands.
My installation succeeded but the gateway won't start—what's different?
Installation success only means the CLI binary is in place. The gateway is a separate service that requires configuration, particularly API keys for the providers you want to use. Run openclaw onboard to configure credentials, then openclaw start to launch the gateway. Gateway startup failures have their own diagnostic path—check openclaw status --all and openclaw logs for specific error messages.
Does OpenClaw work with Node.js versions newer than 22?
Yes, any Node.js version 22 or later should work. The version requirement specifies the minimum, not an exact version. Node.js 23, 24, or later versions include all the features OpenClaw needs. Using the latest LTS (Long Term Support) version is generally recommended for stability. As of early 2026, Node.js 22 is the current LTS version.
Why do I get Sharp errors only on my Mac?
Sharp compilation requires platform-specific binaries for the libvips image library. Pre-built binaries exist for most common configurations, but certain combinations of macOS version, CPU architecture (Intel vs Apple Silicon), and Node.js version might not have pre-built binaries available. The SHARP_IGNORE_GLOBAL_LIBVIPS=1 environment variable tells Sharp to use bundled binaries, bypassing the compilation that causes errors.
Can I use pnpm instead of npm for installation?
Global package installation with pnpm follows different conventions than npm, and the PATH configuration differs. While pnpm add -g openclaw might install the package, you'll need to add pnpm's global bin directory to your PATH: typically $HOME/.local/share/pnpm on Unix systems. The curl installer doesn't account for pnpm, so use the direct pnpm installation method if you prefer it over npm.