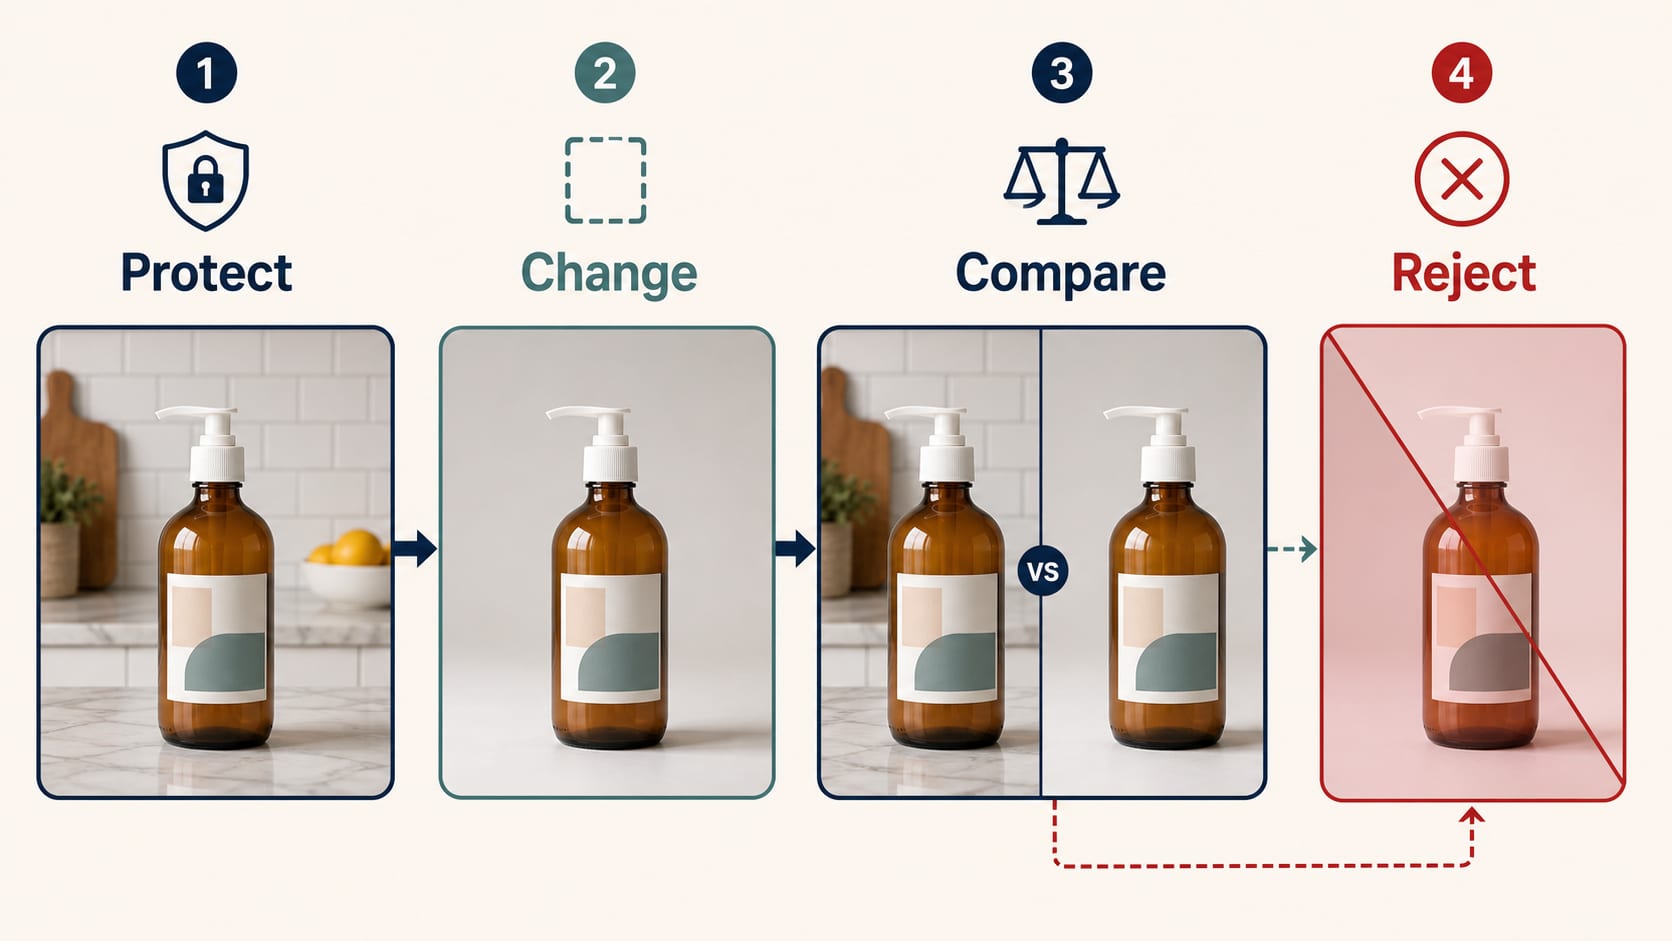
To change a product photo background without changing the product, keep an untouched original, write down exactly what must be protected and what may change, then choose the editing route based on risk. Use a constrained generative edit only when small product changes are easy to detect and correct. Use a cutout-and-composite workflow when product pixels, packaging text, color, or geometry must stay under tighter control. In either route, compare the final image with the original side by side at 100% and reject it if the silhouette, label, color, material, included parts, or product scale has drifted.
That is the practical answer. A prompt such as “change only the background” is useful direction, but it is not a guarantee. The deliverable is not finished when the new scene looks attractive. It is finished when the product still tells the truth and the image meets the current requirements of its destination.
Start with a protect/change specification
Before opening an editor, duplicate the source file and name the untouched copy clearly. Then write a short edit contract with two lists. This takes less than a minute for a simple item and prevents the background request from expanding into an accidental product redesign.
| Protect: must remain true | Change: allowed to move |
|---|---|
| Full silhouette, proportions, camera angle, and included parts | Background color, room, surface, sweep, or scenery |
| Logo, label, model number, claims, units, and variant name | Background-only clutter and reflections caused only by the old setting |
| Product color, material, texture, transparency, and real reflections | Background-dependent shadow direction, softness, and contact point |
| Cap, handle, strap, cord, jewelry setting, seal, and accessories included in the sale | Canvas size or crop only when the final destination requires it |
| Product-facing light pattern when it communicates material or finish | Ambient light and color cast when they can be changed without falsifying the product |
Make the protected list specific to the SKU. “Keep the bottle unchanged” is vague. “Keep the amber glass, white pump, 120 mL label, logo spelling, bottle proportions, and front three-quarter camera angle unchanged” gives both the editor and the reviewer observable targets.
Do the same for the new setting. “Make it premium” leaves too many decisions open. A more useful change specification is: “Replace the kitchen counter with a warm light-gray studio sweep; keep the same camera and crop; add a soft contact shadow directly under the bottle; do not add props.”
This specification is a control aid, not evidence that an AI model will follow it. The final image still needs comparison against the original.
Choose the route before you edit
There are two main ways to replace a product background. They solve the same visible problem but expose different risks.
Route 1: constrained generative editing
In a generative edit, you provide the original as a reference and ask the model to change the setting around the product. This can be convenient for an opaque item with a simple outline, a short or absent label, and a reviewer who can inspect every output.
Use the protect/change specification in the instruction:
Protect the exact product silhouette, label text, logo, cap, color, material, camera angle, crop, and included parts. Change only the background to a warm light-gray seamless studio sweep. Add one soft contact shadow directly below the product, matching the existing light from camera-left. Do not add props, alter reflections, or redesign the packaging.
The wording narrows the task, but the model may still regenerate product pixels. Look for letter substitutions, a different cap shape, smoothed texture, invented seams, shifted color, altered reflections, or a slightly different camera angle. If those details are commercially important, move to the controlled composite route instead of repeatedly prompting around the same failure.
Route 2: cutout and composite
In a cutout workflow, you isolate the real product with a mask or clipping path, place that foreground over the new background, and then rebuild only what the new setting requires. This more directly protects the photographed product pixels. It does not make the job automatic: edges, semi-transparency, color spill, contact shadow, lighting, scale, and perspective still need work.
Adobe’s product-shot tutorial demonstrates the core principle with a layer mask and blend mode that retains the original shadow. The technique is tool-specific, but the reasoning is general: keep the product separate, keep edits reversible, and treat the shadow as its own visual problem.
Choose cutout/compositing when any of these are true:
- Packaging text, a logo, a regulated claim, or a model number must stay exact.
- The item is a real SKU rather than a concept image.
- Several backgrounds will reuse the same approved product cutout.
- The product has predictable opaque edges that a reviewer can refine.
- A generative attempt has already changed product truth.
Move directly to manual retouching or a reshoot when the source is cropped, blurred, heavily compressed, badly color-shifted, or blocked by a hand. Background replacement cannot restore product evidence that the camera never captured.
A reproducible product-safe workflow
Use this sequence for one product before applying it to a catalog.
1. Lock the destination
Decide where the final file will appear: marketplace main image, store product page, collection grid, ad, email, catalog, or design layout. Recheck that destination’s current background, crop, file, and content rules rather than assuming one white or transparent format is universal.
For example, an Amazon US main image and a lifestyle image are different deliverables. A current Amazon seller guidance post states that the main image should use a pure white background and show the actual product without excluded props, extra text, graphics, or watermarks; category rules can take precedence, so verify the current requirement for the listing you are editing. A transparent cutout may be an intermediate asset, not the upload-ready file.
2. Keep the original and make the edit reversible
Preserve the original at full quality. Work in a copy with layers, masks, or versions so you can see which pixels came from the source and which came from the edit. Avoid repeatedly exporting and re-importing a compressed JPEG; compression makes label and edge comparison harder.
3. Write the protect/change specification
Use the table above, then add SKU-specific details. Read the label before editing. Note the exact variant color. Count the included parts. Decide whether the original reflection is part of the material description or merely a reflection of the old room.
4. Run one low-risk test
For generative editing, request one simple background with no props before asking for a lifestyle scene. For compositing, preview the cutout on three temporary backgrounds: white, middle gray, and near-black. A mask that looks clean on its original background can reveal a bright fringe, missing semi-transparent pixels, or jagged edges on a contrasting one.
5. Repair the edge before building the scene
Do not hide a weak mask under blur, glow, or a large shadow. Inspect handles, straps, cords, rims, jewelry prongs, fabric fibers, transparent packaging, and any edge carrying a reflection from the original setting.
Use the smallest repair that matches the defect:
| Visible defect | Likely cause | Repair branch |
|---|---|---|
| White or colored halo | Old background color remains in soft edge pixels | View on a contrasting background; refine the mask or remove edge color spill without erasing a real reflection |
| Jagged outline | Hard or low-resolution selection | Rebuild the mask at source resolution; use minimal smoothing or feathering and inspect again at 100% |
| Missing strap, chain, handle, or fiber | The selection treated a thin part as background | Restore it from the original mask, create a targeted manual path, or reshoot with better separation |
| Glass turns opaque | Transparency was reduced to a binary cutout | Preserve partial transparency with a specialist mask or layered retouch; do not paint glass as solid |
| Product edge looks melted | Generative pixels crossed the product boundary | Reject that output or composite the untouched product over the approved background |
| Dark or light rim on a new background | Original environment remains in a reflective edge | Decide whether it is true product reflection or removable color spill; retouch locally or reshoot for the intended environment |
A product-photography discussion about a bottle halo makes the important distinction: the bright rim may be the bottle reflecting its original white surroundings, not simply a few bad background pixels. The practical repair can require rebuilding the reflection or reshooting for the darker setting, not erasing the entire edge. See the original problem and practitioner discussion.
6. Make the product belong in the new scene
Once the edge is sound, check five relationships:
- Contact: The product must meet a surface. A small contact shadow or reflection should begin where the object touches the ground; a gap makes it float.
- Shadow: Direction, softness, length, and darkness should follow the new light. Preserve a real shadow only when it agrees with the replacement background.
- Light: Highlights and shadows on the product should be plausible under the scene’s visible light. Adobe’s current guidance notes that a shared lighting direction keeps layered effects coherent.
- Scale: Compare the product with surfaces, props, and familiar objects. A mug, shelf, tile, hand, or leaf can accidentally make a bottle look twice its real size.
- Perspective: The product base, camera height, horizon, and surface plane must agree. A straight-on pack shot placed on a steep tabletop often looks pasted even when the mask is clean.
If you cannot make these relationships credible without warping the product, simplify the background. A neutral sweep with an honest contact shadow is better than an elaborate scene that falsifies scale or geometry.
7. Export a review file, not just a pretty preview
Export at the destination’s needed dimensions and color space, while retaining the layered working file. Review the exported file because resizing, transparency handling, color conversion, and compression can create defects that were not obvious in the editor.
Shopify’s current product-photography guidance is a useful reminder that capture quality still matters: it recommends controlling the camera position, white balance, light and shadows, keeping label type centered, and retouching only after evaluating the photograph. It also describes white and transparent backgrounds as different options rather than one universal answer. See Shopify’s product photography guide.
8. Compare original and final side by side
Put the untouched original on the left and the final export on the right. Match their zoom level and inspect at 100%. When possible, align them as layers and blink between them or lower the top layer’s opacity. This reveals small geometry and label shifts that a normal before/after gallery can hide.
Use this acceptance table:
| Check | Pass condition | Reject when |
|---|---|---|
| Silhouette and geometry | Every contour, opening, part, and proportion matches the source | A cap, handle, corner, chain, cord, or product face has changed |
| Label and identity | Logo, spelling, numbers, units, claims, barcode-facing details, and variant are unchanged | Text is invented, softened beyond use, moved, or replaced |
| Color and material | The SKU color and finish remain credible under the new setting | Color shifts variant identity or matte, gloss, metal, glass, fabric, or leather changes character |
| Transparency and reflections | Clear and reflective regions remain physically plausible | Glass is filled, reflections contradict the scene, or the product becomes opaque |
| Included parts | Only items actually sold are shown and nothing has disappeared | AI adds a prop that looks included or removes an accessory |
| Scale and perspective | Product size, camera angle, horizon, crop, and surface plane agree | The scene makes the product materially larger, smaller, tilted, or reshaped |
| Shadow and contact | The object touches the surface and shadow direction matches the light | It floats, sinks, casts two conflicting shadows, or has a pasted-on glow |
| Edge and export | No halo, jagged contour, clipped fine part, transparency seam, or compression damage | Any defect is visible at the buyer’s display size |
Know when to repair, switch routes, or reject
“Try again” is not a complete failure plan. Route the problem according to what failed.
- Background-only defect: Keep the approved product layer and regenerate or rebuild only the background.
- Small mask defect: Repair the specific edge, then recheck it on light, gray, and dark backgrounds.
- Product pixels changed: Reject the generative output and use the untouched product in a cutout/composite workflow.
- Label or regulated copy changed: Reject immediately. Do not reconstruct important text by guessing.
- Light, contact, or perspective mismatch: Simplify the scene, rebuild the shadow, or choose a background photographed from a compatible angle.
- Transparent, reflective, or fine-edge product remains unstable: Send it to a skilled retoucher or reshoot it with deliberate lighting and separation.
- Source truth is missing: Reshoot. A background tool cannot reliably recover a cropped part, unreadable label, incorrect color, or hidden accessory.
Keep the rejected file and a one-line reason during a test. A small rejection log—“logo changed,” “glass filled,” “scale implausible,” “white halo on black”—helps you decide whether a workflow is improving. It also prevents an attractive failed image from returning to the approval queue later.
Three examples and the safer route
Opaque cosmetics bottle with a readable label
Start with a simple studio background and a strict protect list for the label, pump, bottle color, volume, and proportions. A generative test may be reasonable if every character can be compared at full size. If the second attempt still changes the label or pump, stop prompting and composite the original bottle.
Silver necklace with thin links
Use a high-resolution cutout and expect manual mask work. Test it on both light and dark backgrounds before adding a scene. Check that every link and stone setting remains present and that the new shadow does not turn the chain into a thick line. If the source is too small to resolve the links, reshoot rather than invent them.
Clear pouch with reflective printing
Treat the pouch body, contents, print, partial transparency, and reflections as separate review targets. A binary remove/keep mask can make the pouch opaque, while a generative edit can rewrite the printing. This is a manual-retouch or controlled composite candidate. If the original room reflection dominates the material, reshooting against a background designed for the final use may be faster and more truthful.
A bounded YingTu test path
The public English YingTu image workspace showed a prompt field and optional reference-image upload when checked on July 27, 2026. Generation required a valid API key in that observation. This run did not verify a successful product-preserving background edit, a downloaded result, or repeatability.
If you already have authorized access, you can use the workspace for a bounded test: upload a non-sensitive reference image, paste the protect/change specification, request one neutral background, and compare the result with the original using the acceptance table above. Do not treat the upload control as proof of pixel-locked editing or describe YingTu as an integrated background remover. If product truth changes, reject the output and use a controlled composite or reshoot.
FAQ
Can AI change only the background of a product photo?
It can attempt a background-only edit, but a preserve instruction does not guarantee that product pixels will remain unchanged. Compare the output with the original and use cutout/compositing when label, geometry, color, or material accuracy is high risk.
Is background removal the same as background replacement?
No. Removal isolates the product, often as a transparent cutout. Replacement puts that product into a new background and must also solve edge color, contact, shadow, lighting, scale, and perspective.
Should I use generative editing or a transparent cutout?
Use a constrained generative edit for lower-risk, easy-to-review products and early creative tests. Use a cutout and composite when real product pixels, packaging text, repeatable catalog assets, or several approved backgrounds matter more than speed.
How do I remove a white halo around a product?
Preview the cutout on a contrasting background at 100%, then determine whether the halo is leftover background color, a soft mask, or a real reflection from the original environment. Refine the mask or edge color locally. For glass and reflective products, aggressive erasing can destroy the material; retouch or reshoot instead.
Should I keep the original product shadow?
Keep it only when its direction, softness, shape, and contact point fit the new background. Otherwise isolate or rebuild the shadow. The product should touch the surface, and all visible lighting cues should agree.
How can I tell whether the product scale is wrong?
Compare the product with the scene’s surface, horizon, props, and familiar objects, then compare its frame occupancy with the original. If context makes a bottle, bag, chair, or piece of jewelry materially larger or smaller than it should be, reject or simplify the scene.
What products need the most manual review?
White-on-white items, glass, jewelry, reflective metal, transparent packaging, lace, fibers, thin straps, glossy labels, and products with small critical text need stricter review. Difficulty depends on the source photo and workflow, so these are risk flags rather than guarantees of failure.
When should I reject the edit instead of repairing it?
Reject when the product identity changes: wrong label, logo, variant color, geometry, material, included parts, or meaningful claim. Also reject when repair would require inventing detail missing from the source. Route the job to an approved cutout, skilled retoucher, or reshoot.
Do all ecommerce product photos need a white background?
No. The correct file depends on the current destination and image role. Some marketplace main images require or strongly prefer white, while store pages, secondary images, design layouts, and ads can use other backgrounds. Recheck the exact channel, country, category, and account-facing rule before export.