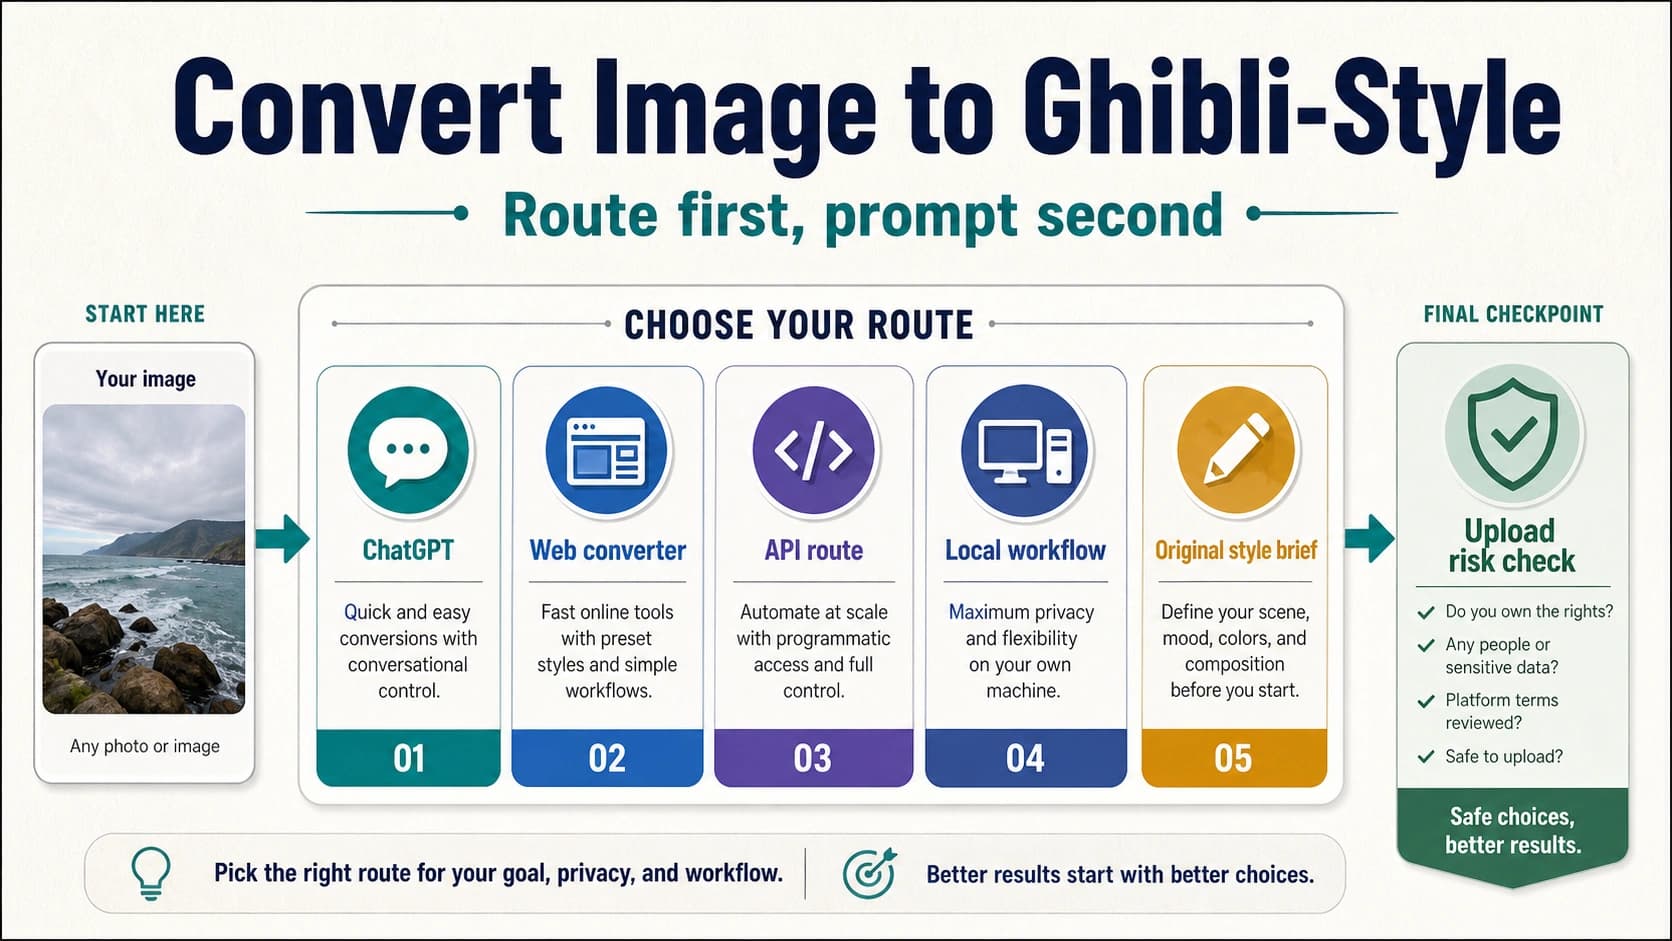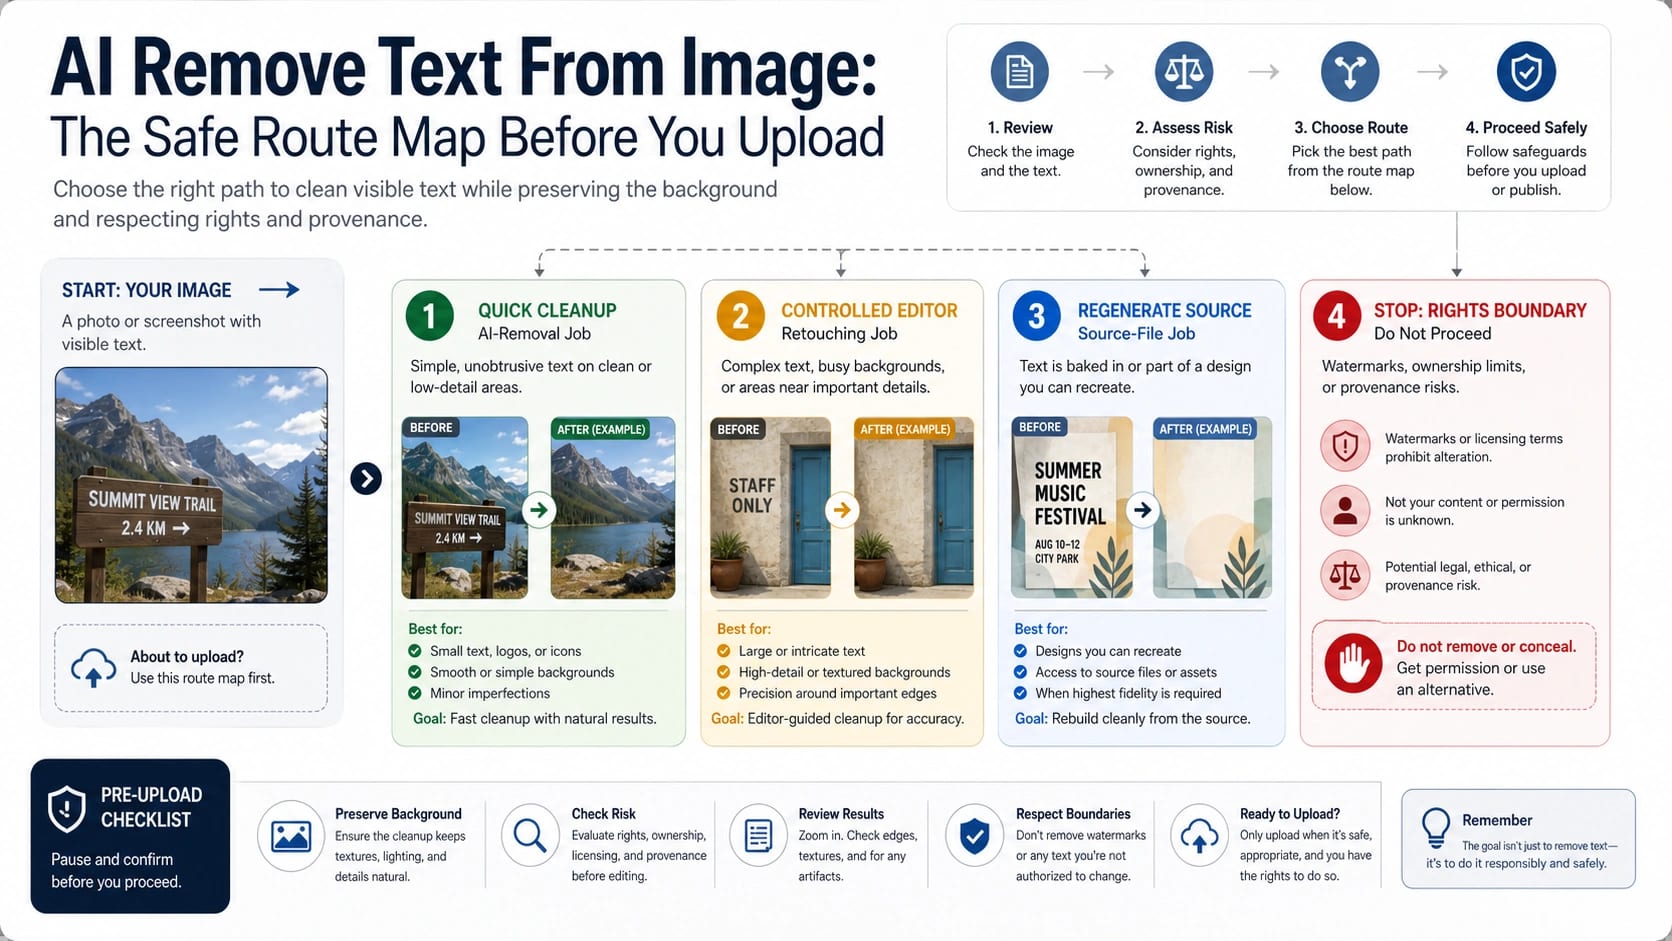
AI can remove ordinary visible text from many images, but the safe answer is not always "upload it to the first remover you find." First decide what the text is: a low-risk caption or date stamp, a screenshot note, a product label, a source-design layer, a private document, a logo, a watermark, or a provenance mark.
Use a quick online remover only for ordinary text you have the right to alter and where the background is simple enough to inspect. Use a controlled editor or professional retouching route when the text crosses faces, product geometry, UI, gradients, repeated textures, or client assets. If the goal is exact replacement, rebuild the text in the source design instead of asking AI to erase and guess. If the mark signals ownership, licensing, authenticity, or provenance, stop and get permission, a clean source, or the right licensed file.
The practical route board is: remove low-risk visible text, edit controlled assets with review, regenerate source text when precision matters, and do not erase rights or provenance signals.
Start With the Text Type, Not the Tool Name
The phrase "AI remove text from image" sounds like one task, but the file in front of you may belong to several different jobs. A date stamp on your own travel photo is a cleanup job. A screenshot note in an internal tutorial is usually a cleanup job if no private data is exposed. A poster headline that must change from one phrase to another is a design-editing job. A watermark, copyright mark, source label, or authenticity marker is a rights and provenance question before it is a pixel question.
That distinction should change what you do next:
| Text you want to remove | Better first route | Why it fits |
|---|---|---|
| Date stamp, small caption, casual screenshot note | Quick online remover or simple editor | The text is disposable and the background is usually easy to inspect |
| Product label, UI text, poster text, document text | Controlled editor or source-design file | Exact letters, spacing, and layout matter |
| Text over faces, hair, logos, gradients, or repeating patterns | Professional retouching, Photoshop-style workflow, or manual review | AI fill can damage geometry, texture, and recognizable details |
| Private document, client asset, unreleased product, identifiable person | Controlled account, approved internal workflow, or manual editor | Upload policy and retention matter as much as output quality |
| Watermark, ownership mark, provenance label, third-party logo | Stop, license, request a clean file, or preserve the mark | Removing it can hide rights or authenticity information |
This is why a tool page that says "upload, remove, download" is only one piece of the decision. It can be useful for ordinary visible text, but it does not prove that every image is safe to upload, that every mark should be removed, or that the background will survive a difficult repair.
Choose the Route That Matches the Risk
For low-risk ordinary text, a lightweight online remover can be the fastest route. These tools usually ask you to upload the image, mark or auto-detect the text area, preview the filled background, and download the result. Use this route when the image is yours, the text is not a rights signal, the file contains no sensitive material, and a small background imperfection would be acceptable.
For design assets, use an editor workflow. Canva describes a text-removal route through its editor features, including Grab Text-style workflows for changing or removing text in an image. That kind of editor route is more appropriate when you need to keep layout context, export a social graphic, or combine cleanup with a design change. It is still not a universal permission slip: Canva also warns that removing a watermark without the owner's consent is generally illegal, which is the right boundary to keep in mind for any editor.
For hard backgrounds, use a professional retouching route. Adobe Photoshop's Remove tool documentation describes object and distraction removal with generative AI mode choices, and Lightroom's Generative Remove FAQ separates larger object removal from Heal and Clone for smaller retouching jobs. Those routes matter when the text crosses skin, hair, product shapes, fabric, fine shadows, signage, grids, or repeating patterns. The goal is not just to make the text disappear; it is to keep the image believable under review.
For exact replacement, go back to the source. If you need to change "SALE" to "NEW DROP," translate a poster, update a UI screenshot, or replace brand copy, erasing the old text from a flattened image is usually the wrong first move. Rebuild the source design layer, edit the screenshot in the product or documentation source, or use OCR/editor workflows where the letters can be controlled. AI inpainting can make text-shaped areas look plausible, but it cannot guarantee exact typography, spacing, or brand geometry.
For ownership, watermark, or provenance marks, stop. The safer action is to license the asset, ask the owner for a clean version, regenerate your own image, or leave the mark visible. If the problem is specifically a Nano Banana or Gemini watermark/provenance question, use the dedicated Nano Banana Pro watermark guide instead of treating it as ordinary text cleanup.
Remove Ordinary Text Without Wrecking the Background
A safe cleanup workflow starts before the brush touches the image. Keep the original file, work on a copy, and decide what would count as a failed output before you generate. If the text sits on a flat wall, clear sky, plain paper margin, or simple product background, an AI fill may be easy to inspect. If it sits across a face, a hand, a logo, a package label, a table grid, a patterned shirt, or a UI component, treat the result as fragile until you compare it closely.
Use the smallest mask that fully covers the visible text plus a narrow margin. A huge mask gives the model more room to invent content; a mask that is too tight leaves ghost letters, halos, or chopped edges. If the tool offers auto-detection, still inspect the mask before accepting it. If it offers a brush, zoom in and cover descenders, punctuation, shadows, outlines, and antialiased edges, not just the dark letter centers.
After the first result, inspect the fill in context:
- Does the background texture continue naturally?
- Are edges, shadows, reflections, and gradients consistent?
- Did the tool invent a blur patch, repeated pattern, or smudged rectangle?
- Did nearby faces, hands, logos, UI elements, or product geometry change?
- Would the result still look clean after compression, cropping, or social upload?
If the answer is no, do not keep stacking retries on the edited output. Go back to the original, narrow the mask, choose a more controlled editor, or rebuild the source design. Repeated AI edits can compound blur and make the final image look polished at a glance but wrong under inspection.
Privacy and Upload Safety Come Before Convenience
The easiest text remover is not automatically the safest route for the file. A public browser tool may be fine for a disposable demo image, but a private ID photo, medical form, invoice, customer screenshot, unreleased product image, legal document, or client creative should not be uploaded casually. The same caution applies to images of recognizable people, especially if the text removal changes context or removes disclosure.
Before uploading, ask three questions:
| Question | If the answer is uncertain |
|---|---|
| Do I own the image or have permission to edit it? | Stop or get permission first |
| Does the file contain private, regulated, client, or unreleased information? | Use an approved controlled route or manual editor |
| Does the visible text signal ownership, licensing, provenance, or authenticity? | Preserve it, license the file, or request a clean source |
Tool pages often make route-specific claims about free use, no sign-up, privacy, no watermark, or background preservation. Treat those as claims from that route owner, not as category truth. If a route matters for client delivery, read the current terms, retention language, export behavior, and commercial-use boundary before uploading anything important.
When Text Replacement Needs the Source File
Removing text and replacing text are different jobs. If the reader only wants a date stamp gone, the surrounding background can fill the empty space. If the reader wants different words in the same place, the output must preserve typography, spacing, color, perspective, shadows, and often brand rules. That is a source-design problem.
Use source regeneration when the text belongs to a design layer: posters, flyers, ads, app screenshots, product mockups, menu boards, labels, charts, slides, and thumbnails. In those cases, the best workflow is to edit the original Figma, Canva, Photoshop, Illustrator, Keynote, HTML, or product source, then export the image again. If the original is unavailable, recreate the layout before trying inpainting. It takes longer up front, but it avoids fake letters, inconsistent kerning, and mismatched shadows.
Use OCR or document editing only when the image is really a document workflow. If you need to recover text from a screenshot, OCR may help you reconstruct the content, but it will not make a flattened image editable by itself. If the goal is a clean instructional screenshot, recreate the screenshot in the app or documentation system. If the goal is a translated graphic, rebuild the graphic with real text layers.
Use manual retouching when the text is small but the background is hard. Photoshop, Lightroom, and similar editors give you more control over masks, clone sources, healing, and layered review. That matters for hair, skin, reflections, signage, product packaging, and repeated texture. AI removal can be the first pass; manual review decides whether the result is usable.
How to Talk About Watermarks Without Giving the Wrong Advice
Watermark questions are common because many people use "remove text from image" to mean "remove the text overlay I see." That phrase is too broad. A date stamp on your own photo and a stock-photo watermark are not the same problem. A creator signature, platform mark, copyright label, or provenance signal should be treated as ownership or authenticity information unless you have explicit rights to alter it.
For a file you own, the clean path is usually regeneration or export through the right route, not post-hoc erasing. For a file you do not own, the clean path is licensing, permission, replacement, or leaving the mark visible. For AI provenance, the correct frame is disclosure and traceability, not hiding origin. If the mark came from a Gemini or Nano Banana output, the Nano Banana Pro watermark guide covers visible marks and SynthID boundaries separately.
This boundary also protects ordinary cleanup. Treating watermarks like captions encourages the riskiest use case and makes the safe use case less clear. Keep the ordinary AI text remover route for low-risk text. Keep watermark, ownership, and provenance questions in their own stop-rule lane.
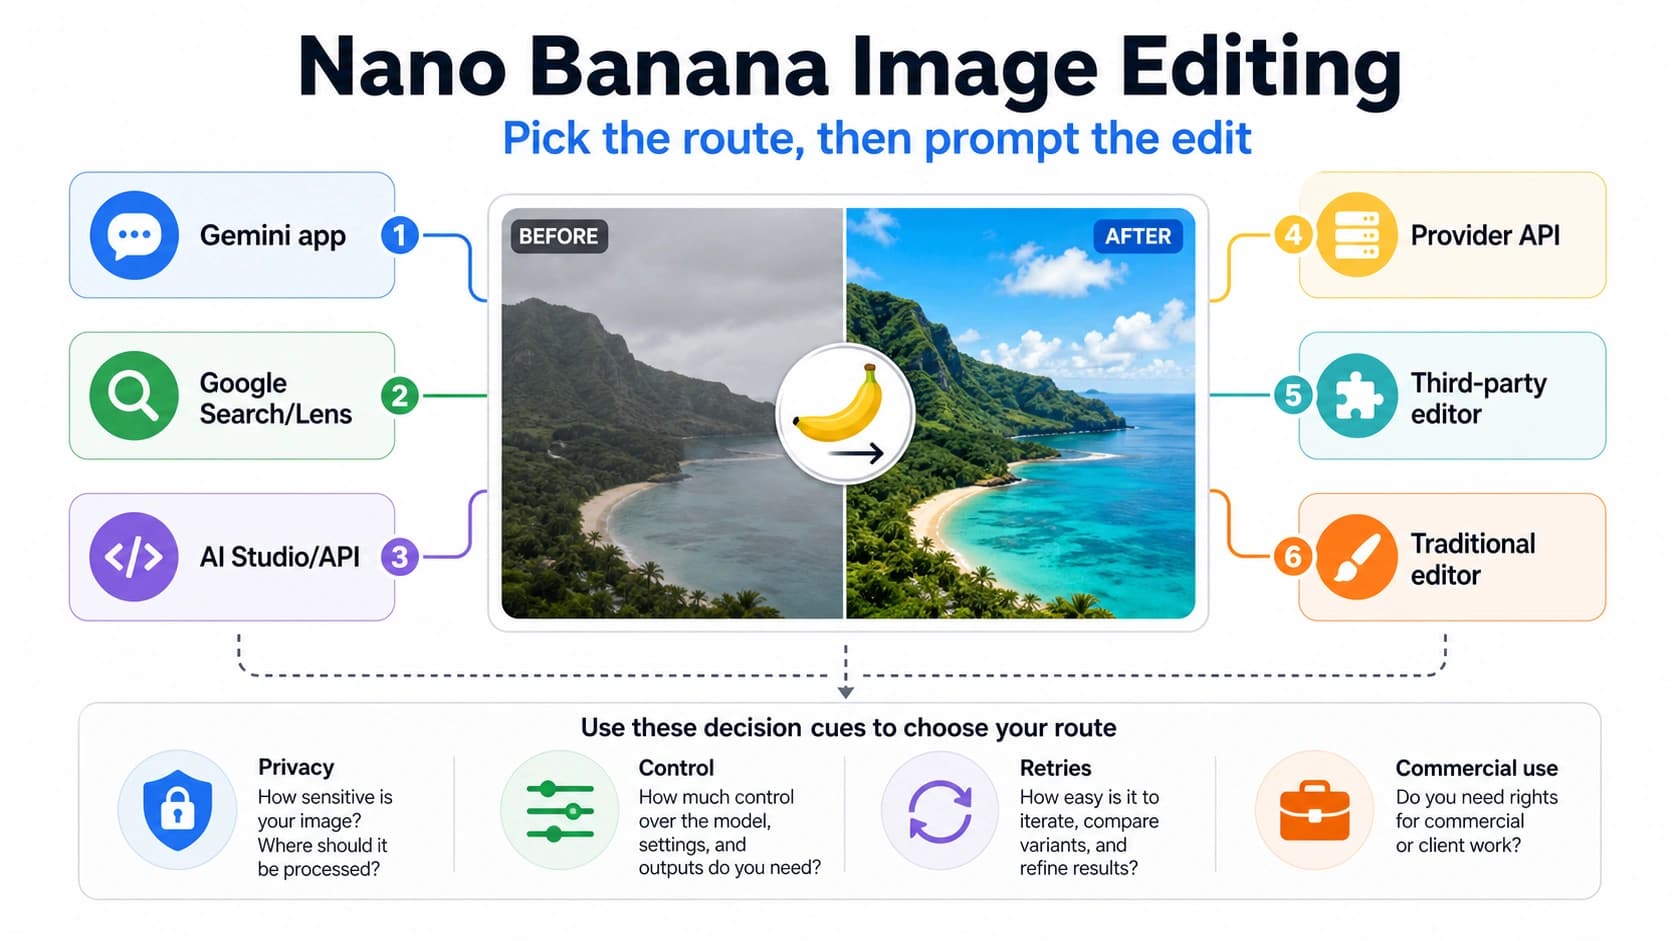
Where Nano Banana and Other Image Models Fit
Nano Banana, Gemini image editing, and other image models can be relevant when the reader's real job is broader image editing: remove an object, change a background, preserve a subject, combine images, or repair a composition. If that is the job, a model-specific editing guide is more useful than a generic text-removal page. For that route, see the Nano Banana image editing guide.
Model choice stays secondary for ordinary visible-text cleanup. The first decision is whether the visible text is safe and appropriate to remove, whether the background is simple enough, and whether the result needs exact text control. A model may help with the fill, but it does not answer permission, privacy, provenance, or source-design questions for you.
FAQ
Can AI remove text from an image for free?
Sometimes, for ordinary low-risk images. Many online text-remover pages advertise free cleanup, but free limits, sign-up requirements, export quality, watermarks, retention, and commercial-use terms belong to each route owner and can change. Do not treat one tool's current offer as a category-wide rule.
What is the best AI text remover?
The best route depends on the file. Use a quick remover for low-risk captions or date stamps, a controlled editor for design assets, Photoshop or manual retouching for hard backgrounds, source regeneration for exact replacement, and a stop or permission route for watermarks and provenance marks.
Can I remove text without damaging the background?
You can improve the odds by using a narrow mask, working from the original file, previewing at full size, and checking texture, shadows, edges, and nearby objects. Simple backgrounds are much safer than faces, product labels, UI, gradients, and repeating patterns.
Should I remove a watermark from an image?
Do not treat a watermark as ordinary clutter. If it marks ownership, licensing, platform origin, or provenance, get permission, license the image, request a clean source, regenerate your own file, or leave the mark visible.
Can AI replace text in a picture?
AI can sometimes create a plausible replacement, but exact replacement belongs in the source design layer whenever possible. Use the original design file, recreate the layout, or edit real text layers when typography, spacing, translation, UI accuracy, or brand fidelity matters.
Is it safe to upload private files to an AI text remover?
Use caution. Private documents, client screenshots, recognizable people, medical or legal material, invoices, and unreleased product images need a controlled route with known upload, retention, and permission rules. A public browser tool is not the default choice for those files.
Can I remove text from screenshots?
Yes, if the screenshot is yours to alter and does not contain sensitive information. For documentation or product screenshots, the cleaner route is often to recreate the screenshot from the source app or documentation system instead of erasing text from a flattened image.