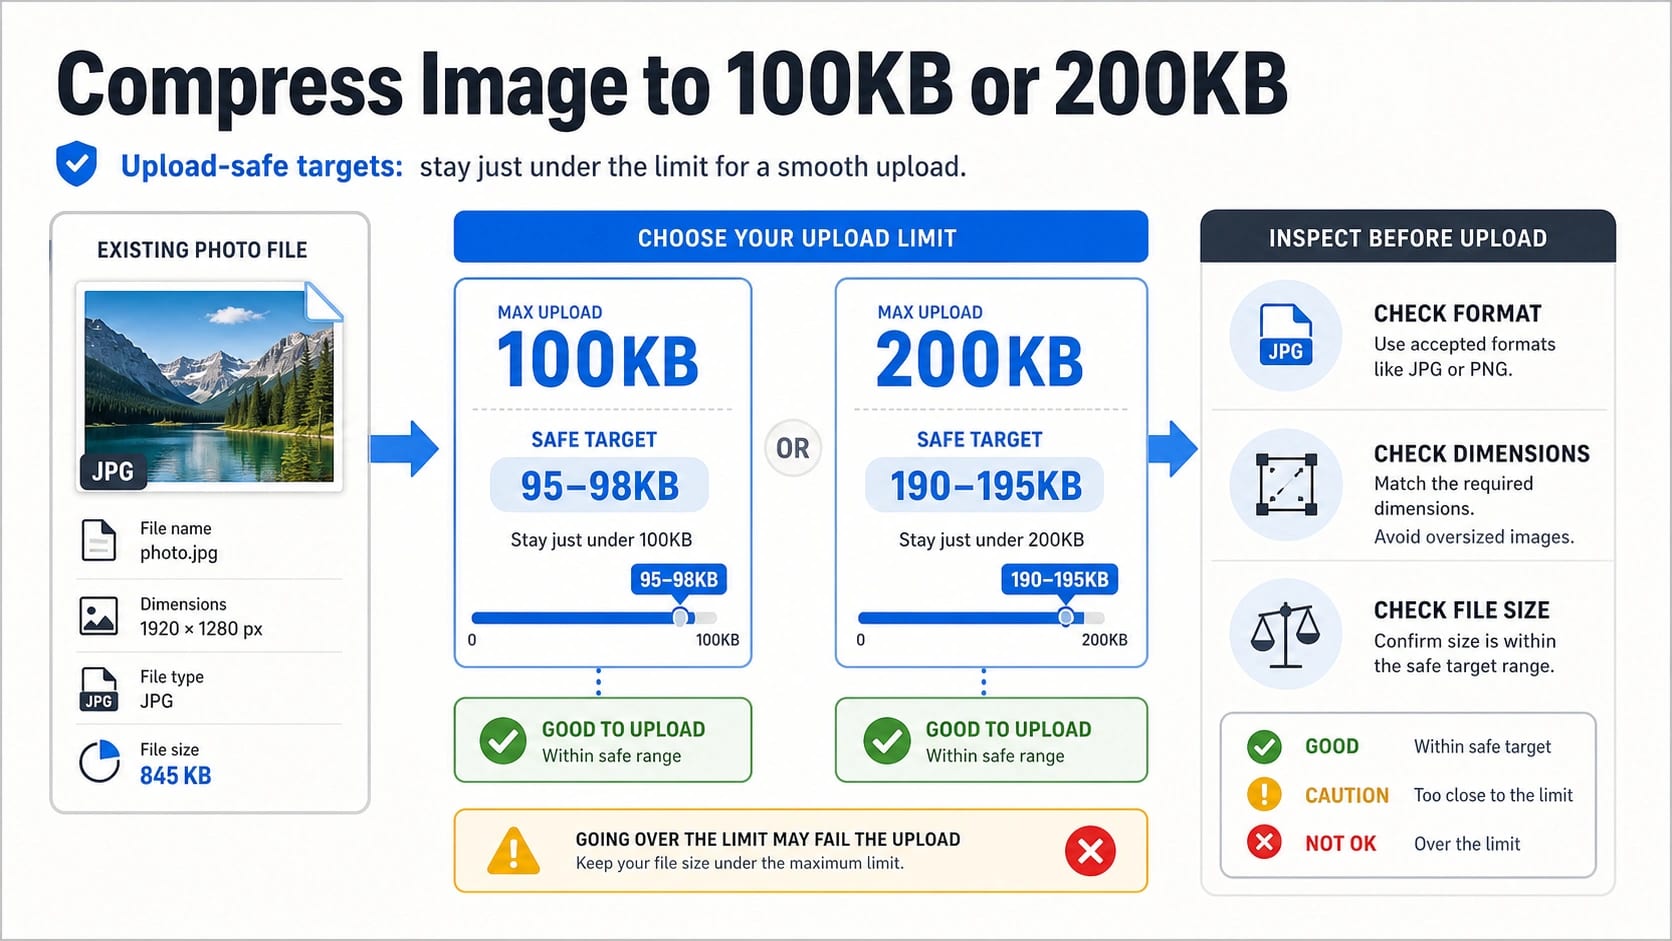
If an upload form says your image must be under 100KB, aim around 95-98KB; if it says under 200KB, aim around 190-195KB. If the form gives a minimum size, exact range, required file type, or required dimensions, follow that rule first instead of chasing the largest possible file below the cap.
Use this order before you upload:
| Check first | Why it matters | What to do |
|---|---|---|
| Maximum or exact KB rule | Some forms reject files that are over the cap, below a minimum, or outside a stated range. | Set a target with a small buffer, then re-check the downloaded file size. |
| File type | JPG, PNG, WebP, HEIC, or PDF requirements are not interchangeable. | Convert only to a format the form accepts; keep PNG when transparency matters. |
| Pixel dimensions | A large photo can stay ugly and still be too big if you only lower quality. | Resize oversized images before pushing quality too low. |
| Visual readability | A file can hit 100KB and still be unusable if text, faces, or details break. | Inspect the final image at the size the form or reader will see. |
| Sensitive content | Online compressors may require uploading the image to a third-party server. | Use a local tool for passports, IDs, medical files, client work, or private photos. |
Stop rule: if the image still fails after compression, do not keep lowering quality blindly. Check whether the form is rejecting the format, dimensions, transparency, exact range, file name, or visual quality before you recompress.
Read the Upload Rule Before You Compress
Most 100KB and 200KB searches happen under pressure: a job application, school form, visa form, marketplace profile, or account verification page refuses the file. The fastest fix is not always the strongest compression setting. The fastest fix is reading the full upload rule once and turning it into a short working target.
Start with the number. A "maximum 100KB" rule means the file must be under the cap. A field that says "50KB to 100KB" is different: a 37KB file may be rejected even though it is small. A field that says "exactly 200KB" or "not more than 200KB" also changes how close you should get to the boundary. When the requirement is max-only, keep a little space under the limit so metadata, browser downloads, or re-saves do not push the final file over.
Then check the non-KB rules. Many upload forms also specify JPG only, PNG only, a minimum pixel width, a fixed aspect ratio, a square crop, a background color, or a naming rule. If the form asks for a JPG and you upload a compressed WebP, the file size will not matter. If the form expects 600 by 600 pixels and your image is 4000 by 3000 pixels, a perfect 190KB output can still be rejected or cropped badly.
Set a Safe Target for 100KB or 200KB
For max-only rules, use a safety buffer:
| Upload cap | Practical target | Why not target the exact cap? |
|---|---|---|
| 100KB max | 95-98KB | It gives a small cushion for metadata, rounding, or re-save differences. |
| 200KB max | 190-195KB | It stays close enough for quality while reducing over-limit surprises. |
| Exact or range rule | Follow the stated range | The portal rule overrides the generic buffer. |
Do not treat 100KB or 200KB as a quality goal. They are upload constraints. A small headshot can look fine under 100KB. A detailed product photo, scanned certificate, or large phone image may need dimension changes before it becomes acceptable. If the image contains small text, faces, fabric, documents, or detailed product edges, inspect readability before you accept the number.
If a tool asks for an exact target size, enter the practical target instead of the cap unless the form explicitly requires an exact value. A file that is 99.8KB may be technically under 100KB, but a portal that rounds differently may show it as 100KB or reject it. A file at 96KB usually gives the same upload result with less boundary risk.
Resize Before You Crush Quality
If the original is a 4000px phone photo, reduce the dimensions before pushing JPEG or WebP quality into the floor. Pixel dimensions control how many image samples must be stored. Quality settings control how aggressively the encoder throws away visual detail. Lowering quality again and again can create blocky faces, muddy text, smeared backgrounds, and noisy gradients while leaving the file larger than expected.
A practical sequence is:
- Keep a copy of the original.
- Resize oversized images to the portal's maximum or to the final display size.
- Choose an output format the portal accepts.
- Adjust quality gradually.
- Remove metadata only when it is safe for the use case.
- Download the file and check the actual saved size.
- Inspect faces, text, edges, and any required background.
This order matches how image size really works. The web.dev image compression guide treats dimensions, format, quality, and metadata as separate levers, not one magic slider. MDN's toBlob() documentation also shows why a quality value is not the same as a guaranteed KB output: browser exports can request a format and lossy quality, but the resulting byte size still depends on the image content and encoder behavior.
Choose JPG, PNG, WebP, or HEIC Based on the Job
Format choice can save more quality than another round of compression. Use the format the receiving form allows first, then choose the most suitable option within that boundary.
| Image type | Better starting format | Watch out for |
|---|---|---|
| Camera photo, portrait, product photo | JPG or WebP if allowed | Very low quality settings can damage faces, edges, and gradients. |
| Screenshot with text or UI | PNG if allowed, WebP if accepted and readable | JPG can blur small text and interface lines. |
| Transparent logo or cutout | PNG or WebP with transparency if accepted | JPG removes transparency and fills it with a background. |
| HEIC phone photo | Convert to JPG if the form does not accept HEIC | Conversion can change color, metadata, and file size. |
| Scanned document | Follow the portal's required format | Over-compression can make text unreadable. |
The web.dev format guide explains why WebP and AVIF can often reduce bytes compared with older formats, while PNG still matters for lossless detail and transparency. The catch is compatibility. Many official forms still ask for JPG or PNG. If the form names a format, obey that format even when another codec would compress better.
Avoid one common mistake: converting every PNG to JPG just because JPG is usually smaller for photos. That works for many camera images, but it can hurt screenshots, diagrams, transparent images, and documents with sharp edges. If the file must stay readable, compare the result before uploading.
Compress, Download, and Inspect the Actual File
Target-KB compressors are useful because they let you set a number such as 100KB, 200KB, 50KB, or 500KB. Use them as execution tools, not as proof that the image is automatically good enough. The correct workflow is compress, download, check the saved file, inspect the image, and only then upload.
For ordinary images, the workflow is simple:
| Step | What to check |
|---|---|
| Upload or open the original | Confirm you are working on a copy, not overwriting your best source. |
| Enter the target size | Use 95-98KB for a 100KB max or 190-195KB for a 200KB max unless the form states an exact range. |
| Choose resize or quality options | Resize large photos before lowering quality too far. |
| Download the result | Check the downloaded file, not just the preview inside the tool. |
| Inspect at real size | Open it where it will be reviewed: profile box, document preview, upload crop, or form thumbnail. |
| Retry with one change | Change dimensions, format, or quality deliberately instead of guessing. |
If the first output misses the target, do not make three random changes at once. If it is still too large, reduce dimensions slightly or lower quality one step. If it is under the cap but looks damaged, raise quality and reduce dimensions instead. If transparency disappeared, return to PNG or a transparency-preserving format the portal accepts.
Use Online Tools Carefully for Sensitive Images
Online compressors are convenient for casual files, but upload safety is not only about file size. A passport scan, government ID, medical image, invoice, client screenshot, unreleased product photo, private family photo, or internal document should not be uploaded to an unknown tool just because the tool is fast.
For sensitive files, prefer a local workflow. Squoosh is a browser image compression app whose open-source README describes it as processing images in the browser rather than sending them to a server for compression. Desktop editors, built-in operating system preview tools, and trusted offline utilities can also reduce dimensions and export a smaller JPG or PNG without handing the original to a third-party compressor.
If you still use an online service, read its current privacy and retention notes on the page you are using. Do not assume every tool deletes files quickly, handles every format, or keeps uploads private. Treat deletion windows, no-limit wording, free use, batch size, and format support as provider-specific claims that can change.
Why the Upload Still Rejects the Image
When a compressed image still fails, the cause is usually not mysterious. Match the rejection to the rule that failed.
| Symptom | Likely cause | Fix |
|---|---|---|
| The file is still over 100KB or 200KB | The target was too close, metadata stayed in, or the image has too many pixels. | Aim lower, resize dimensions, then compress again. |
| The file is below the cap but still rejected | The form has a minimum size, exact range, file type, dimension, or naming rule. | Re-read the upload instructions and match the missing requirement. |
| The image looks blurry or blocky | Quality was pushed too low for the image detail. | Reduce dimensions instead of lowering quality further, or use a higher target if the portal allows it. |
| Text in the image is unreadable | JPG compression or resizing damaged fine edges. | Try PNG if accepted, reduce dimensions less aggressively, or create a clearer source image. |
| Transparency is gone | The image was saved as JPG or a tool flattened the background. | Use PNG or a transparency-preserving WebP if the form accepts it. |
| Colors or crop changed | The tool converted format, stripped metadata, or the portal cropped the image. | Export again with the required aspect ratio and inspect after upload preview. |
If the form has a preview screen, use it. A file can pass the byte-size test and still fail the human review because the face is too small, the document text is not legible, the background is wrong, or the crop cuts off required content.
Tool Examples Without Turning This Into a Ranking
Many current compressor pages follow the same pattern: upload image, enter a target size, compress, download. That is useful, but a guide should not pretend one untested tool is universally best. Use tool pages as examples of routes:
| Route | When it helps | What to verify |
|---|---|---|
| Exact-KB online compressor | You need a quick 100KB or 200KB output for a non-sensitive image. | Supported formats, privacy notes, output quality, and downloaded file size. |
| Resizer plus compressor | The original has far more pixels than the portal needs. | Final dimensions, aspect ratio, and readability. |
| Desktop editor or preview app | The image is sensitive or you want more control. | Export format, quality setting, and final file size. |
| Browser/local compression app | You want compression without casual server upload. | Whether the app actually processes locally and whether it supports the required format. |
The important decision is not "which button is best." It is whether the route fits the image, the portal rule, and the privacy level of the file.
FAQ
Should I compress to exactly 100KB or exactly 200KB?
Only if the form asks for an exact size or exact range. For a max-only rule, aim slightly under the limit: about 95-98KB for a 100KB cap and 190-195KB for a 200KB cap.
Why does my image look bad at 100KB?
100KB is a tight limit for large or detailed images. Resize oversized dimensions first, choose a suitable format, and then lower quality gradually. If faces, small text, or product details break, the file may meet the number but fail the real purpose.
Is JPG always better than PNG for 100KB or 200KB?
No. JPG is usually efficient for photos, but PNG can be better for transparency, screenshots, diagrams, and sharp text if the form accepts it. WebP may compress well, but compatibility depends on the receiving form.
Can I compress images on a phone?
Yes. The same rules apply: keep a copy, resize if the photo is huge, choose the required format, target slightly under the cap, download or save the result, and inspect the actual file before uploading.
Is an online image compressor safe for passport or ID photos?
Not automatically. Sensitive images deserve a local or trusted workflow. If you use an online tool, read the current privacy and deletion notes for that specific service and avoid uploading files that should stay private.
Why does the portal reject a file that is already under 200KB?
The rejection may be about file type, dimensions, aspect ratio, minimum size, exact range, transparency, file name, or visual review. Check the full upload instructions before compressing again.
Does removing metadata help reduce image size?
Sometimes. EXIF data, GPS information, thumbnails, and editor metadata can add bytes. Remove metadata only when it is safe for the use case; some workflows may need orientation, camera, or provenance information.
What is the best way to keep quality?
Do not rely on one quality slider. Resize to the required dimensions, choose the right format, use a small buffer under the KB cap, and inspect the final image. Quality is judged by the upload purpose, not by the file-size number alone.