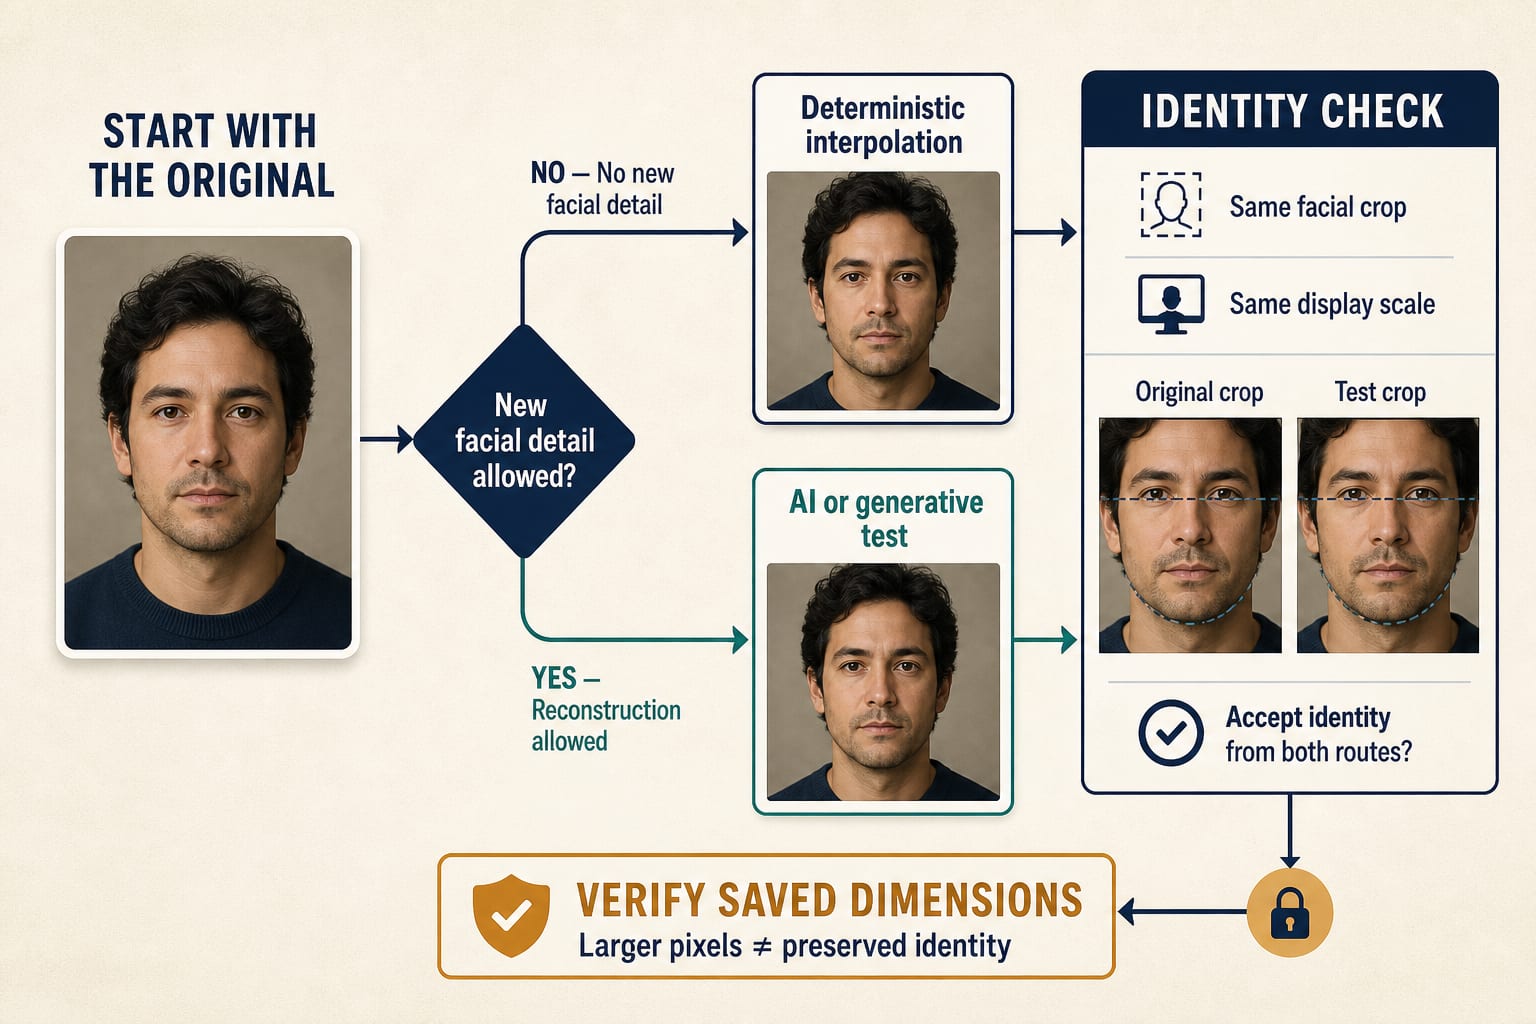
If the person must look exactly the same, start with deterministic interpolation, not a generative redraw. It enlarges the pixel grid without asking a model to invent a better face. The tradeoff is equally important: it cannot recover facial detail that the original never captured.
An AI upscaler may produce a more convincing large image, but it may also reconstruct eyes, teeth, skin, hair, or expression. A reference-image generator can go further still. Therefore, “the file is now 4K” is a size result—not proof that identity survived.
Before choosing a tool, preserve the untouched original, write down the required output dimensions, and answer one question:
Is the workflow allowed to invent facial detail?
That answer determines the safest route.
Choose the route by what may change
| Route | Use it when | What it may change | What proves success |
|---|---|---|---|
| Deterministic interpolation | No invented facial detail is acceptable, or privacy and repeatability are strict | The pixel grid and interpolated edges; existing blur and compression may become more visible | Saved width and height, unchanged aspect ratio and crop, controlled compression, and a same-scale visual comparison |
| Dedicated AI upscaler | Some reconstruction is acceptable and you can test the provider on a harmless sample | Sharpness, texture, and reconstructed face or background detail | A recorded model and settings, a saved final file, and a face-identity review |
| Generative redraw or reference-image edit | Missing detail must be synthesized and recognizable consistency is enough | Facial geometry, expression, skin, hair, clothing, background, lighting, or composition | Declared invariants, a same-scale comparison, and an explicit review of identity-critical features |
| Native high-resolution generation | You are creating a new asset rather than preserving an existing photograph | The entire image | An explicit output-size setting and the dimensions of the downloaded file |
The crucial distinction is between enlargement and reconstruction. Interpolation calculates new pixels from existing neighbors. AI enhancement and generative editing can infer or synthesize content. Those operations can be useful, but they solve different problems and require different acceptance evidence.
Define the delivery target before you enlarge
“Make it high resolution” is not a measurable target. Use the actual delivery requirement.
For a website, presentation, marketplace listing, or social post, find the final pixel box. If the destination displays the photo at 1600 × 2000 pixels, producing 4096 × 4096 pixels may add processing and file weight without helping the delivered image.
For print, calculate the target pixel dimensions:
hljs texttarget pixels = print size in inches × required pixels per inch
An 8 × 10 inch print at 300 PPI requires 2400 × 3000 pixels. Adobe’s current Photoshop resize guidance describes 72–96 PPI as typical for screen or web and 300 PPI for best-quality print, while also instructing users to constrain aspect ratio and enable resampling when interpolating pixels. Treat those figures as output guidance, not a promise that changing PPI metadata creates real detail. (Adobe: Resize images)
Record these properties before editing:
- original width and height;
- aspect ratio;
- file format;
- crop boundaries;
- intended web box or print size;
- required output width and height;
- any features that must not change, including text, logos, clothing, or background objects.
If the source is a scan, first check whether a better scan is possible. A cleaner source usually gives every enlargement method more trustworthy information than a more aggressive model can manufacture.
Workflow 1: Enlarge without asking AI to redraw the face
Use this route for identity documents where enlargement is permitted, archival records, evidence, memorial photographs, or any image where a changed expression or facial feature makes the result unusable.
1. Preserve the source
Keep the original untouched and work on a duplicate. Do not repeatedly resave a JPEG; each lossy save can add compression artifacts that later sharpening may exaggerate.
2. Lock the aspect ratio and crop
Enter the target width or height with the aspect-ratio constraint enabled. If the requested dimensions require a different aspect ratio, decide whether to pad or crop before resizing. Do not let an automatic tool silently crop a forehead, chin, hand, logo, or background object.
3. Use an interpolation resize
Choose the editor’s ordinary resize or resample operation rather than a face enhancer, restoration model, creative upscaler, or generative fill. The software will create a larger grid, but it will not reconstruct a sharper identity.
This may look softer than an AI result. That softness can be the honest outcome: the source did not contain enough information for a crisp large portrait.
4. Export a controlled working file
For an intermediate or archival master, use a lossless format when practical. If the destination requires JPEG, export once at an appropriate quality and keep the lossless or original copy.
5. Verify both the file and the face
Confirm the saved dimensions and aspect ratio. Then compare the original and result using the same facial crop at the same display size. Comparing one image zoomed in and the other fit to screen can hide drift or exaggerate softness.
Finally, inspect the output at its intended delivery size. A file can look rough at extreme zoom yet be acceptable in print; it can also look fine as a thumbnail while halos or plastic skin become obvious in a large print.
Workflow 2: Test a dedicated AI upscaler without trusting the label
US search results currently favor upload-first tools and portrait-enhancement guides. Their common promise is simple—upload, select a scale, compare, and download—but their own pages also reveal the boundary. For example, Let’s Enhance warns that a very small, blurred, or compressed face cannot be fully restored and recommends moderate scaling; Topaz describes a model that adds facial detail and lets the user adjust enhancement strength; ImageUpscaler says it reconstructs detail from shapes, edges, and contrast. These are reconstruction workflows, even when they market “preservation.” (Let’s Enhance portrait guide, Topaz Face Enhancer, ImageUpscaler)
Use a controlled trial:
- Read the provider’s current upload, retention, privacy, and usage terms before sending a sensitive portrait.
- If possible, test with a harmless image that has similar face size, blur, lighting, and compression.
- Start with the smallest factor that meets the delivery target. Avoid choosing the maximum scale merely because it is available.
- Turn face recovery, beautification, restoration, creativity, and aggressive sharpening off or down for the first run.
- Record the service, model, scale factor, settings, date, and downloaded dimensions.
- Compare the original and result with the acceptance sheet below.
- Reject the output if an identity-critical feature changes, even if the result is sharper.
Do not treat a provider’s before-and-after slider as your proof. It demonstrates a selected example under provider-controlled conditions. Your source, face size, damage, and settings may behave differently.
The face-identity acceptance sheet
Use this sheet for every reconstructed result. It is deliberately visual and manual: no single unvalidated face-recognition score or universal numeric threshold should decide whether a family member, client, or historical subject still looks correct.
| Check area | Pass only when | Reject when | Result |
|---|---|---|---|
| Eyes and brows | Shape, spacing, gaze, eyelids, brow shape, and natural asymmetry match | Eye size, gaze, lid crease, spacing, or eyebrow geometry shifts | ☐ Pass ☐ Reject |
| Nose, mouth, and teeth | Nose width, nostrils, lip contour, mouth opening, and visible teeth remain consistent | New teeth appear, the smile changes, or nose and lip geometry drift | ☐ Pass ☐ Reject |
| Face outline | Jaw, cheeks, chin, ears, and hairline retain the same proportions | The face becomes longer, narrower, younger, smoother, or differently shaped | ☐ Pass ☐ Reject |
| Expression and age cues | Expression, wrinkles, under-eye detail, and age remain recognizable | Neutral becomes smiling, wrinkles disappear, or age noticeably changes | ☐ Pass ☐ Reject |
| Identity marks | Moles, scars, freckles, facial hair, glasses, jewelry, and other distinguishing marks are preserved | Marks vanish, move, or are invented; accessories change shape | ☐ Pass ☐ Reject |
| Subject count and anatomy | Every person remains present with the same pose and visible hands | A person, finger, ear, hand, or facial part is added, removed, or malformed | ☐ Pass ☐ Reject |
| Non-face invariants | Clothing, logos, text, background objects, crop, color, and lighting stay within the declared scope | Words, logos, garments, background details, crop, or lighting drift | ☐ Pass ☐ Reject |
| Artifacts | Intended-size viewing shows natural edges and texture | Halos, crunchy edges, plastic smoothing, invented pores, repeated patterns, banding, or compression are visible | ☐ Pass ☐ Reject |
| Delivery file | Width, height, aspect ratio, format, crop, and compression meet the requirement | The file is large but has the wrong dimensions, ratio, crop, or export quality | ☐ Pass ☐ Reject |
Acceptance rule
The output passes only when:
- every identity-critical row passes;
- every declared non-face invariant passes;
- the saved file meets the delivery dimensions; and
- the image looks acceptable at the intended viewing size.
If a sharper result changes the eyes, mouth, expression, face outline, or a distinguishing mark, it fails.
Where a generative reference-image workflow fits
Generative image models are useful when you need to synthesize missing detail, restage a subject, expand a composition, or create a new high-resolution asset. They are not the safest first route when exact identity preservation is non-negotiable.
Google’s current Gemini image-generation documentation says Gemini 3 image models support reference-image workflows and explicit 2K or 4K output choices. Those controls establish generation capabilities and output-size options; they do not establish that a reference portrait will remain pixel-faithful or identity-exact. (Google AI for Developers: Image generation)
YingTu currently exposes optional reference images and visible 1K, 2K, and 4K controls. Use that path only as a controlled generative comparison when redraw is acceptable:
- upload a working copy or a non-sensitive test image;
- describe the invariants that should remain, such as identity, expression, crop, clothing, and background;
- choose the smallest output size that meets the delivery need;
- save the generated result;
- compare it with the original using the acceptance sheet;
- keep it only if the allowed-change policy permits every observed difference.
YingTu has not been verified here as a dedicated pixel-only upscaler. This workflow did not upload a face, run a generation, download an output, verify its dimensions, or prove face preservation. A 4K control, reference image, prompt such as “keep the face identical,” or successful request is not a guarantee of faithful enlargement.
Three route examples
A family photo for an 8 × 10 inch reprint
The family wants the same expression and recognizable details; invention is not acceptable. Calculate the printer’s pixel requirement, use deterministic interpolation on a working copy, and accept that the enlarged file may remain soft. If the source is a scan, try a better scan before an AI reconstruction.
A small profile photo for a website
The final box is 800 × 800 pixels, and slight texture reconstruction is acceptable. Test a dedicated AI upscaler at the minimum useful scale with beautification and creative controls disabled. Compare the eyes, mouth, jaw, age cues, and hairline before using it.
A new campaign visual inspired by a portrait
The goal is a new composition, not an archival enlargement. A generative reference-image workflow can be appropriate, provided the subject has authorized the use and the team accepts recognizable consistency rather than exact identity. Label the result internally as a generated derivative, not as a restored original.
What to do when the result fails
| Visible failure | Likely cause | Next branch |
|---|---|---|
| The face looks like a different person | The model reconstructed identity-critical geometry | Return to the original; reduce enhancement or scale, disable face recovery, or use deterministic interpolation |
| Skin looks plastic or pores look invented | Smoothing, sharpening, or synthesized texture is too aggressive | Lower enhancement, try a fidelity-oriented model on a harmless sample, or reject reconstruction |
| The file is larger but still soft | Interpolation increased dimensions without recovering missing detail | Accept the honest limitation, improve the source scan, or test a dedicated upscaler if reconstruction is allowed |
| The face matches but clothing, text, or background changed | A generative editor treated the whole image as editable | Declare and inspect non-face invariants; use a narrower edit or a non-generative route |
| The crop or aspect ratio changed | The target box and source ratio conflict | Return to the original and choose crop, padding, or a matching output ratio explicitly |
| It looks good on screen but fails in print | The required pixel dimensions or intended viewing distance were not checked | Recalculate target pixels and inspect at the final print size |
Frequently asked questions
Can a prompt guarantee that the face stays identical?
No. A prompt can express intent, but it does not constrain every generated pixel or prove identity preservation. Always inspect the saved output.
Does a 4K setting mean the photo has four times more real detail?
No. It specifies an output-size class. The extra pixels may come from interpolation or synthesis; neither proves that missing source detail was recovered accurately.
Is an AI face enhancer the same as an upscaler?
Not necessarily. A face enhancer may detect and reconstruct facial features, while an upscaler may change resolution across the entire image. Some products combine both. Check the active model and controls instead of relying on the product label.
Is YingTu a verified face-preserving, pixel-only upscaler?
No. YingTu’s reference-image and high-resolution controls can support a generative comparison when change is allowed, but this article does not claim a dedicated pixel-only upscale route or guaranteed face preservation.
Can a face-recognition score approve the result?
Not by itself. A score depends on the model, crop, threshold, and image conditions. Unless the method has been validated for your use case, keep it as supporting evidence and perform the visual identity review.
Should I denoise or sharpen before enlarging?
Only with a controlled copy. Heavy denoising can erase skin texture and identity marks; aggressive sharpening can create halos. Change one stage at a time and compare against the untouched original.
What is the safest option for a private or sensitive portrait?
Use a local deterministic resize when it meets the task. If you need a cloud AI service, verify its current retention, training, deletion, access, and commercial-use terms before uploading, and obtain authorization from the person or rights holder.
When should I stop trying to restore a face?
Stop when the source lacks enough information and every reconstruction changes identity-critical features. A softer faithful enlargement is often better evidence than a sharp invented face.
The short version
- Decide whether invented facial detail is allowed.
- Define the exact pixel target.
- Preserve the untouched original.
- Use deterministic interpolation when identity must not change.
- Use a dedicated AI upscaler only as a controlled reconstruction test.
- Use a generative reference-image route only when redraw is acceptable.
- Compare the same facial crop at the same scale.
- Reject any identity-critical change, regardless of sharpness or file size.
A successful upscale is not merely a larger image. It is a delivered file that meets its dimensions and passes the identity and invariant checks appropriate to the chosen route.